IMPORTANT! - all templates are based on CodeWalker30_dev44. Future releases might be contains resolved unk so templates might not work.
In that situation use build dev_44
Note: this tutorials are presentation of my way of doing certain stuff and how i understand things looking into game files. Im just share what i know from my perspective.
Also i know that some of stuff can be done in CW instead of OpenIV or vice versa or same as GIMS+3dsMax and Sollumz+Blender. I dont participate in stupid wars between different apps. Im just using both depends on personal preferences at certain situations.
Note2: check Monky's git for additional info about audio research: >LINK<
1. Base explanation
In many places in this tutorial will be copy from template rel file to your rel file, it doesnt matter where you put your copied xml segment and in what order organise it by yourself how it will be handy for your work.
About naming for this tutorial ive used simplified version for example:
simplesound_wavname compared to rockstar naming folderwithcontainersname_containername_wavname
simplified version will be better for beginners, advanced users will see patterns by themselfs its easy to figure out.
Important is to have unique names for all stuff cuz if chosen name already exist in vanilla files sound wil not work.
Also if you have already one mod installed with custom sounds u dont need create new dat54 file u can use direct names by calling StreamingSound or other types from one mod inside your dat151 file, its same like searching fo vanilla templates cuz custom songs are already registered in that mod with custom audio.
Its only basic tutorial i had in plans to make bigger tutorial but amount of free time what it took ive decided to stay at basics stuff, when wil have more time and mood for making tutos and there will be no any other tuto related to audio ect then will create more.
2. Audio occlusion and .rel files preparation
For creation of audio occlusion theres already tutorial so you can watch here [credits to ultrahacx]:
Output files you will have "game.dat151.rel.xml" and inside folder named same as your interior will be occlusion file named as numbers.ymt.pso.xml
numbers are unique for your interior.
I suggest having unique names for all of .rel files for example having format in naming like dlc name/mod name+game.dat151.rel
1. Change game.dat151.rel.xml into modname_game.dat151.rel.xml
2. Using CodeWalker import numbers.ymt.pso.xml into location (if you dont have it, then create):
mods\update\x64\dlcpacks\modname\dlc.rpf\x64\audio\occlusion.rpf
3. Import modname_game.dat151.rel.xml into location:
mods\update\x64\dlcpacks\modname\dlc.rpf\x64\audio
[IMPORTANT: import dat151 generated from occlusion app not from templates]
4. Import modname_sounds.dat54.rel.xml from templates into same location as dat151
You can also use template dlc for this tutorial.
[replace modname with name of your dlc/mod name]
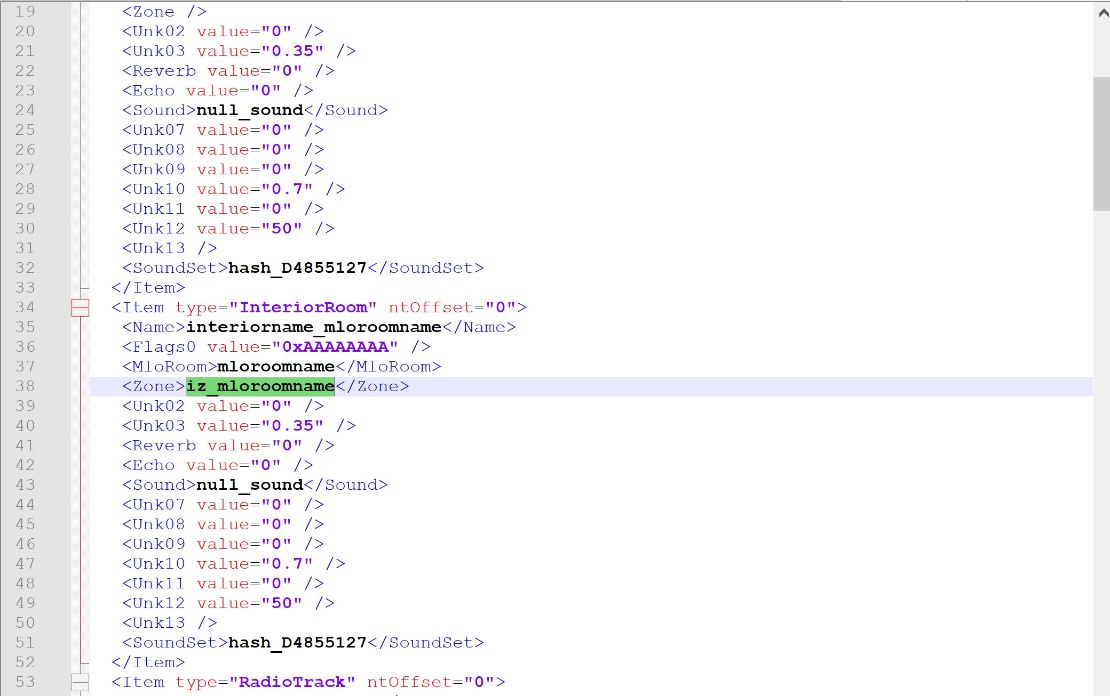
3. Creation of mlo room tone (using vanilla sounds)
In dat151 u can setup for each mlo room its room tone using vanilla entries. When entering portal to room it will have desired roomtone.
You need to test by yourself what exact tone is by selecting one of vanilla setups.
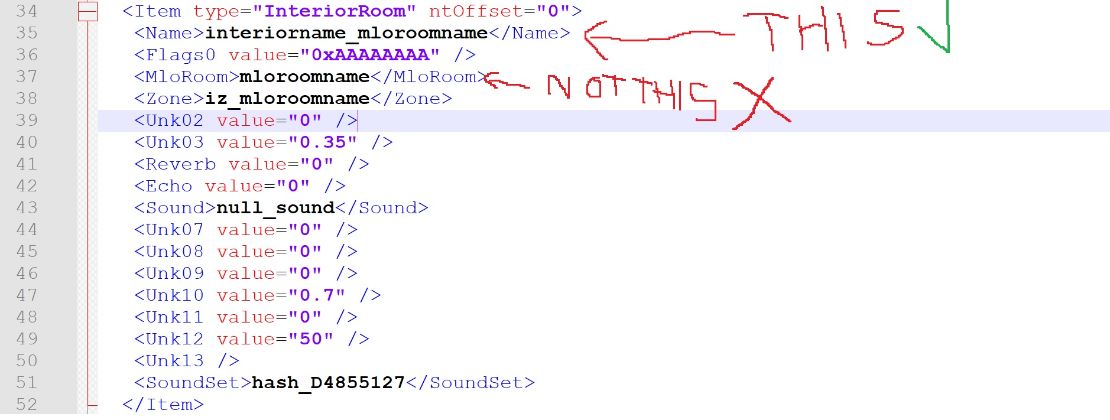
Theres sound section in each mlo room. By default it has null_sound:
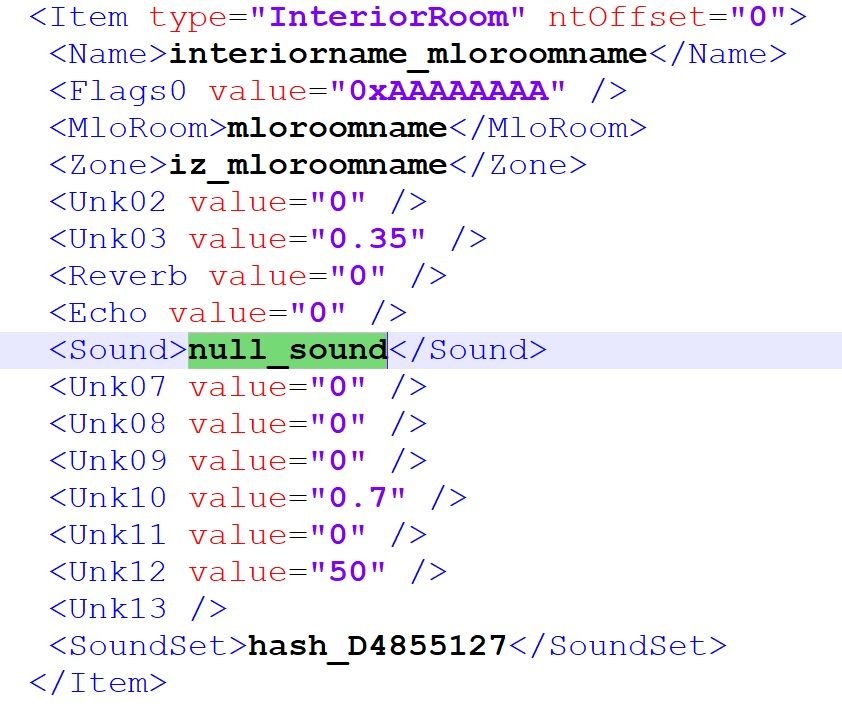
Change it to one of these example vanilla values:
dlc_h4_nightclub_roomtone
dlc_h4_int_sub_roomtone_general
dlc_h4_int_sub_roomtone_small
dlc_h4_office_room_tone_wrp
dlc_h4_vault_room_tone
dlc_apt_apartments_roomtone_yacht
dlc_apt_yacht_bridge_bridge_room_tone
dlc_vinewood_apartment_roomtone
dlc_vinewood_carpark
dlc_vinewood_garage
dlc_vinewood_casino_room_tone
hash_470DA449
hash_CB513B46
hash_14C4DE8E
hash_52BD77D0
hash_25B9E10A
hash_F7053865
hash_3E85112C
hash_0CDBD379
hash_8760A5FA
To find more room tones (theres many new roomtones added by different dlcs) search in dat151 files entries in interior rooms:
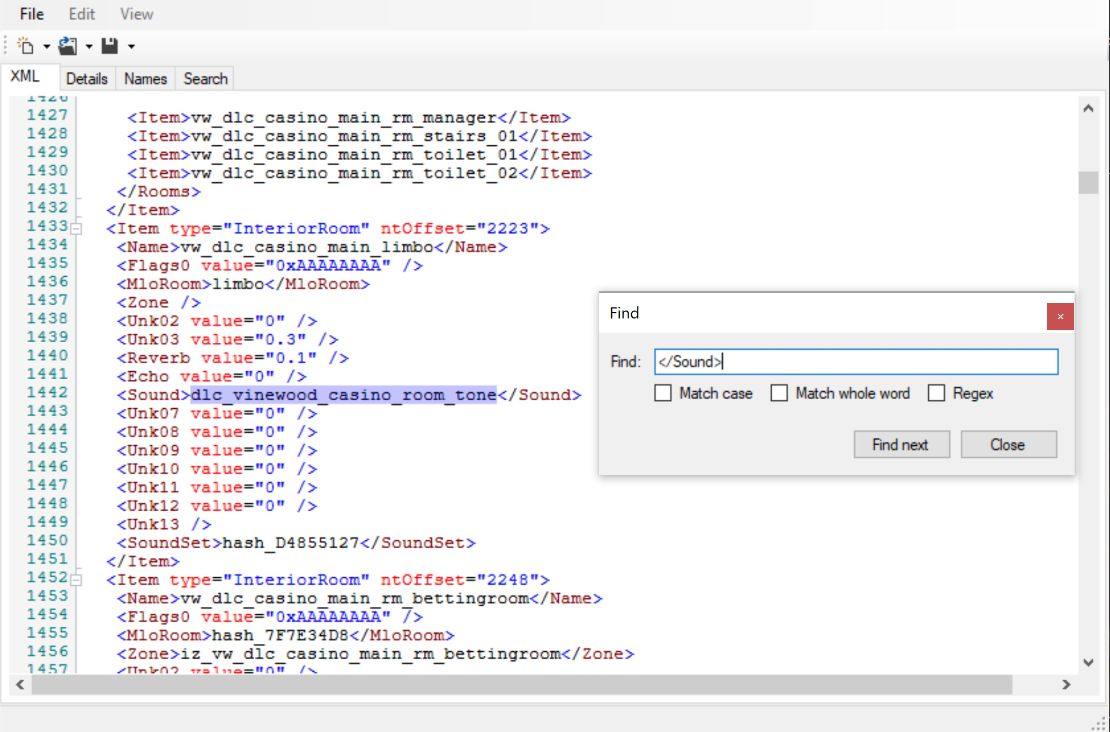
Note: Each unique name place in .nametable file otherway everything with custom names will be hashed.
4. Static emitter with vanilla radio.
You can place static emitter with radio inside mlo room or at any place outside mlo. But to enable/disable it you need to use native AUDIO::SET_STATIC_EMITTER_ENABLED
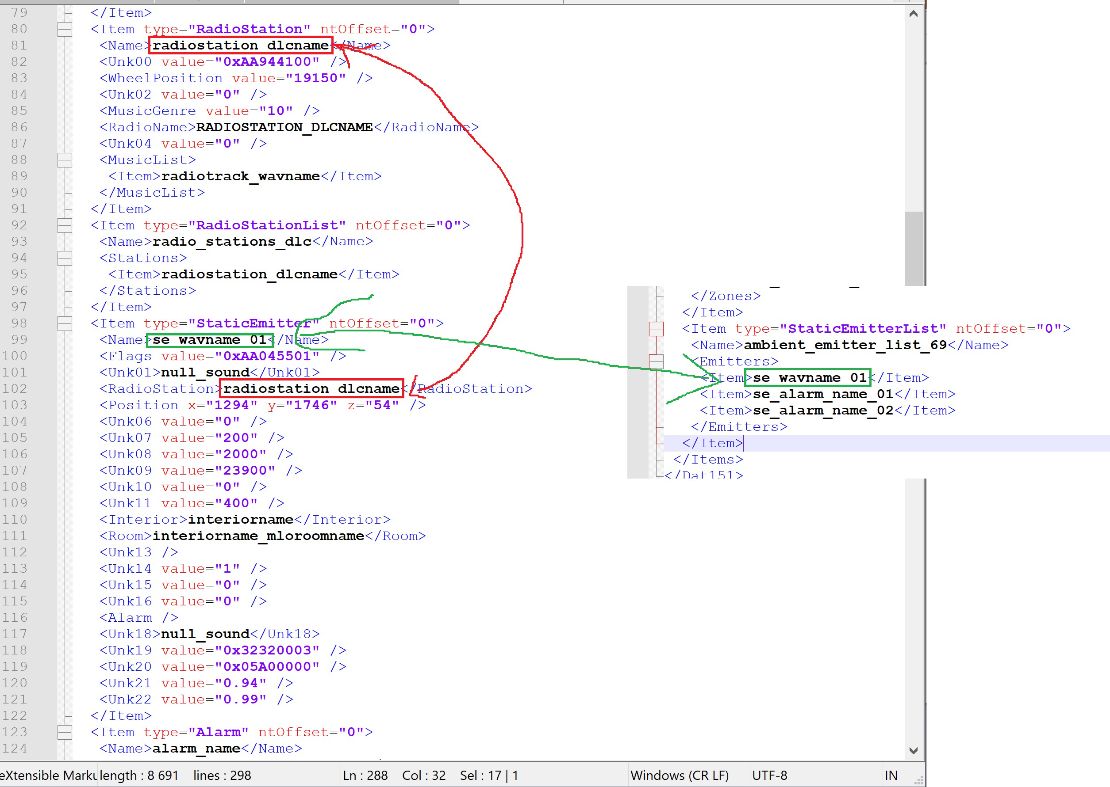
1.Open template dat151.xml file and copy this section and paste into your dat151 file:
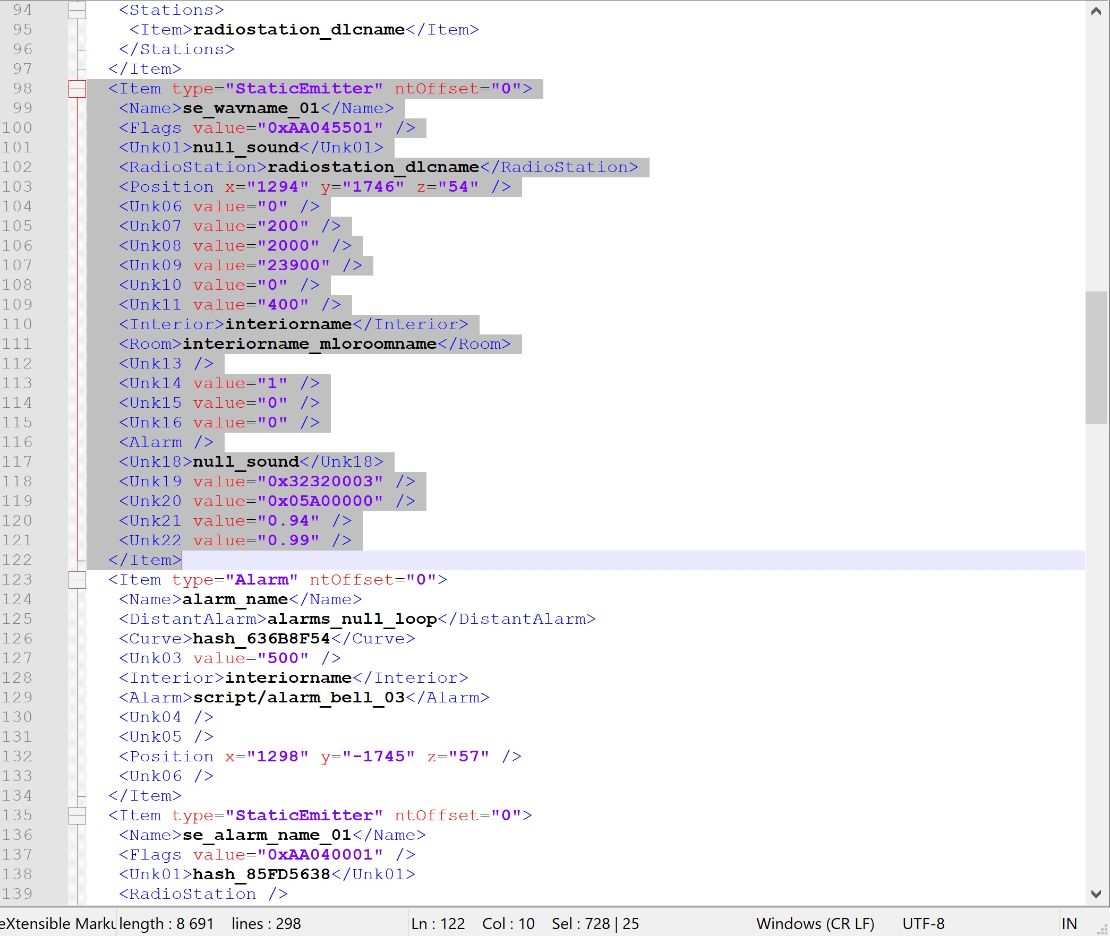
2. Select also this section from template dat.151.xml file copy and paste it into your dat151 file:
3. Rename static emitter name se_wavname_01 to unique name by replacing wavname to you custom name, also make sure your name of static emitter is same like name in StaticEmitterList (between <Item> and </Item>)
4. Do not change name of StaticEmitterList which is ambient_emitter_list_69 (in my tests safe is to change only numbers any other custom name can cause emitters to not work so better leave it as it is)
5a. If emitter will be at location outside mlo then remove entries for Interior and room changing it to:
<Interior/>
<Room/>
5b. If emitter will be inside mlo then change interiorname and interiorname_mloroomname to your actual mlo name and its room name:
Note: roomname is name from InteriorRoom NOT MloRoom name.

6. In Position section put coords for your emitter
Note: for mlo emitter use word coords not mlo offset
7. In radiostation section put one of these radio examples:
radio_16_silverlake
radio_15_motown
radio_14_dance_02
radio_13_jazz
radio_12_reggae
radio_11_talk_02
hidden_radio_10_surf
radio_09_hiphop_old
radio_08_mexican
radio_07_dance_01
radio_06_country
radio_05_talk_01
radio_04_punk
radio_03_hiphop_new
radio_02_pop
radio_01_class_rock
radio_15_motown
radio_14_dance_02
radio_13_jazz
radio_12_reggae
radio_11_talk_02
hidden_radio_10_surf
radio_09_hiphop_old
radio_08_mexican
radio_07_dance_01
radio_06_country
radio_05_talk_01
radio_04_punk
radio_03_hiphop_new
radio_02_pop
radio_01_class_rock
You can find other types by searching RadioName in any dat151 file.
8. Add to your script native which will enable static emitter for example in C#:
Function.Call(Hash.SET_STATIC_EMITTER_ENABLED, "se_wavname_01", true); //setting bool to false will disable emitter
5. Static emitter with custom audio.
To play any custom audio (song/playlist of songs) you need convert them into separate mono channels.
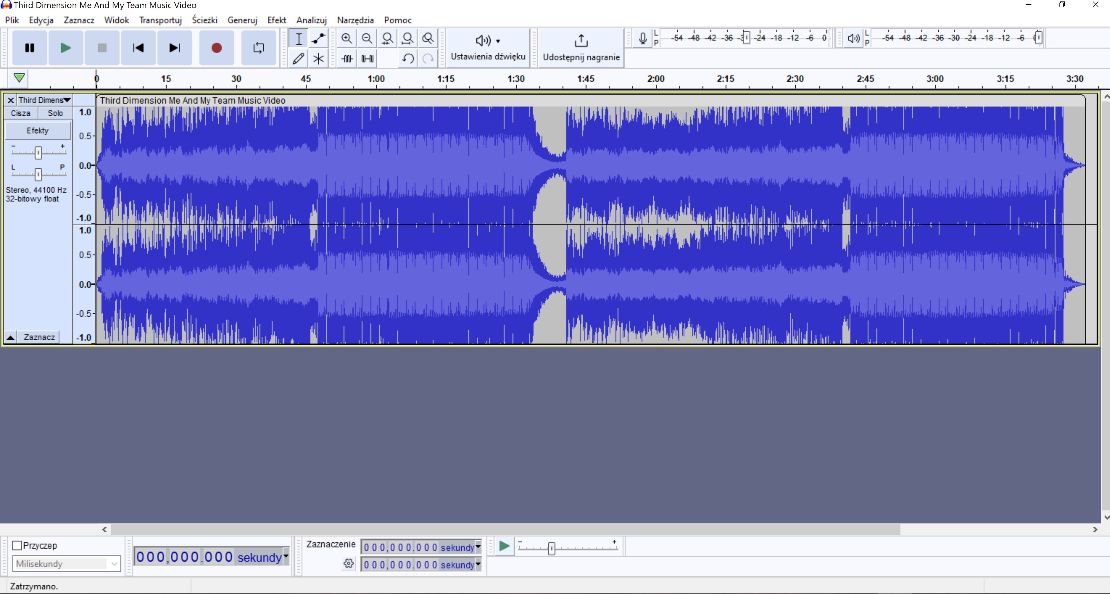
1.Open Audacity and import mp3 song into it, you will see 2 stereo channels (ofcorse if your mp3 or supported input format will be stereo):
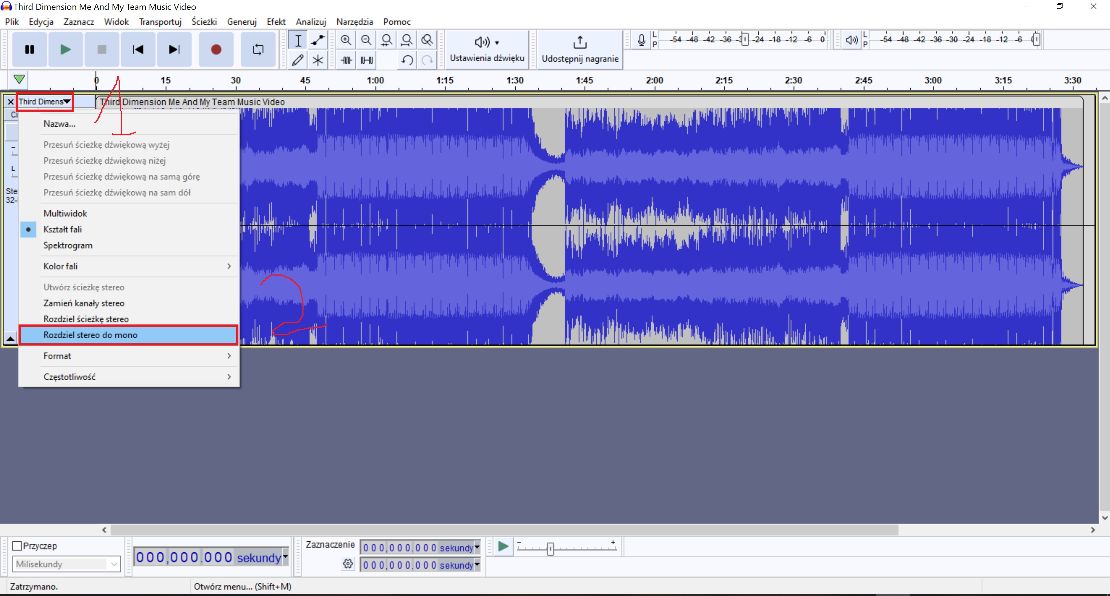
2. Select "split stereo to mono"
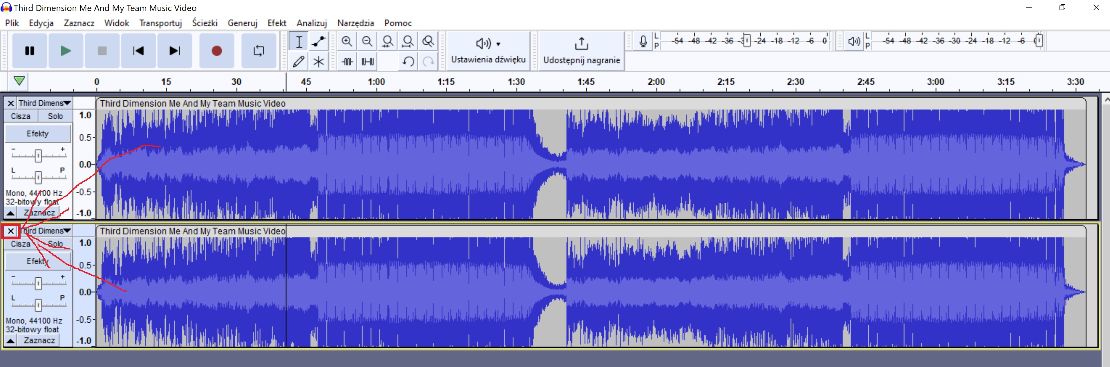
3. Now you have two separate mono channels, select bottom one and delete it:
4. This one mono channel save it as signed 16-bit PCM and name it wavname_left where wavname change to your name. Leave _left in name cuz it will indicate thats left mono channel.
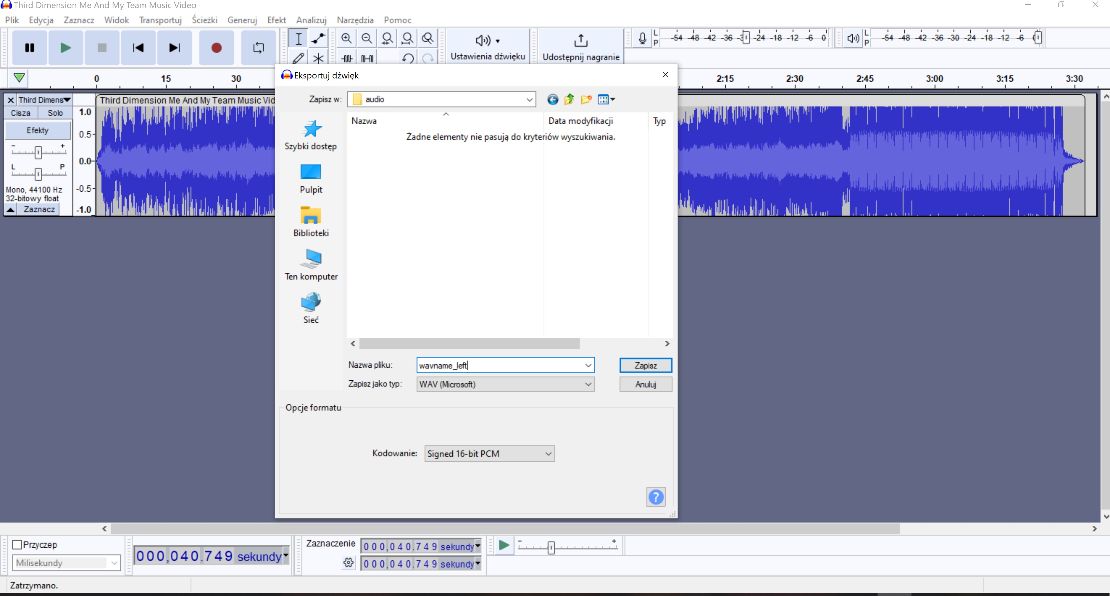
5. Import again mp3 file into Audacity and repeat process - convert to mono but this time delete upper channel and save it as signed 16-bit PCM and name it wavname_right where wavname change to your name. Leave _right in name cuz it will indicate thats right mono channel.
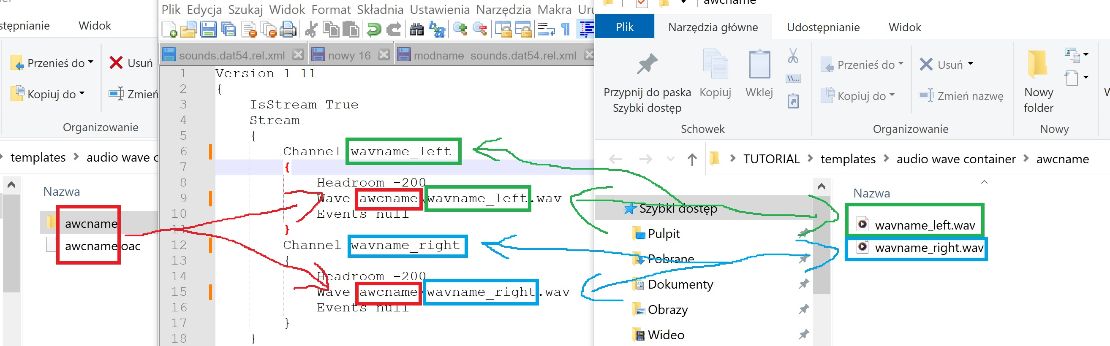
6. Now put these two .wav files in template folder templates\audio wave container\awcname
7. Change name of folder awcname and awcname.oac file to your custom unique name (must be unique and different from already existing .awc containers in game)
8. Edit your .oac file and change names inside:
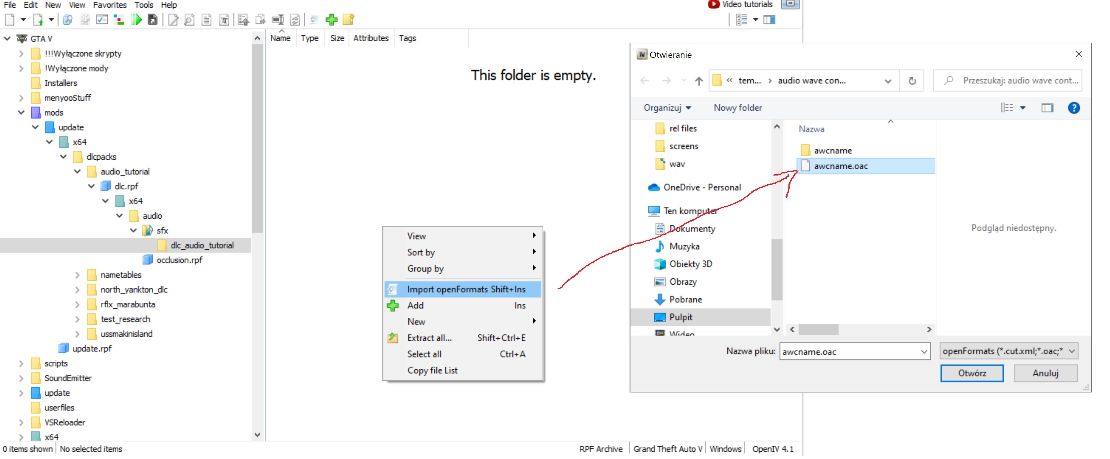
9. In OpenIV in edit mode turned on, go to location:
mods\update\x64\dlcpacks\modname\dlc.rpf\x64\audio\sfx\dlc_modname
Choose import openFormats and import your .oac file:
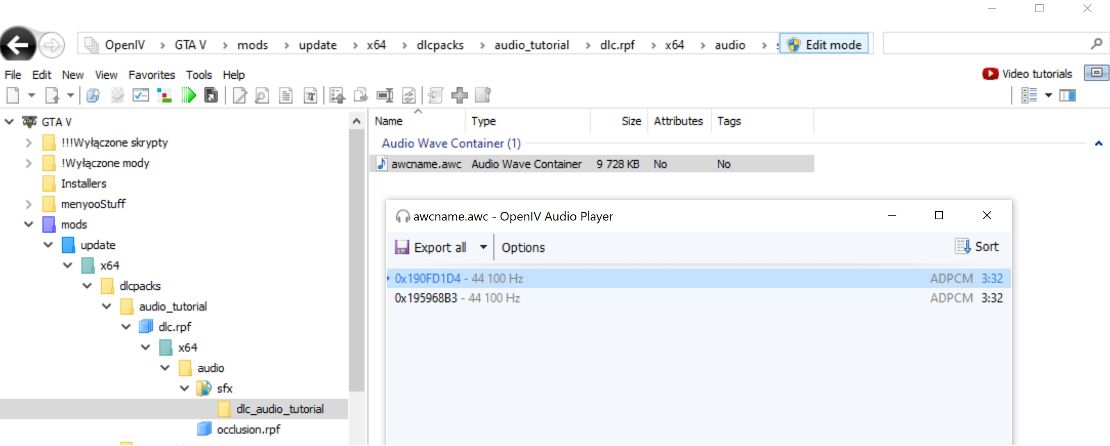
10. After importing check if song plays correctly
11. Now back to CodeWalker (dont use OpenIV and CodeWalker at same time specially with edit mode cuz it can corrupt files)
Edit your modname_game.dat151.rel into location:
mods\update\x64\dlcpacks\modname\dlc.rpf\x64\audio
and change all names to your custom names of audio files, also add all custom names to .nametable otherway names will be hashed:
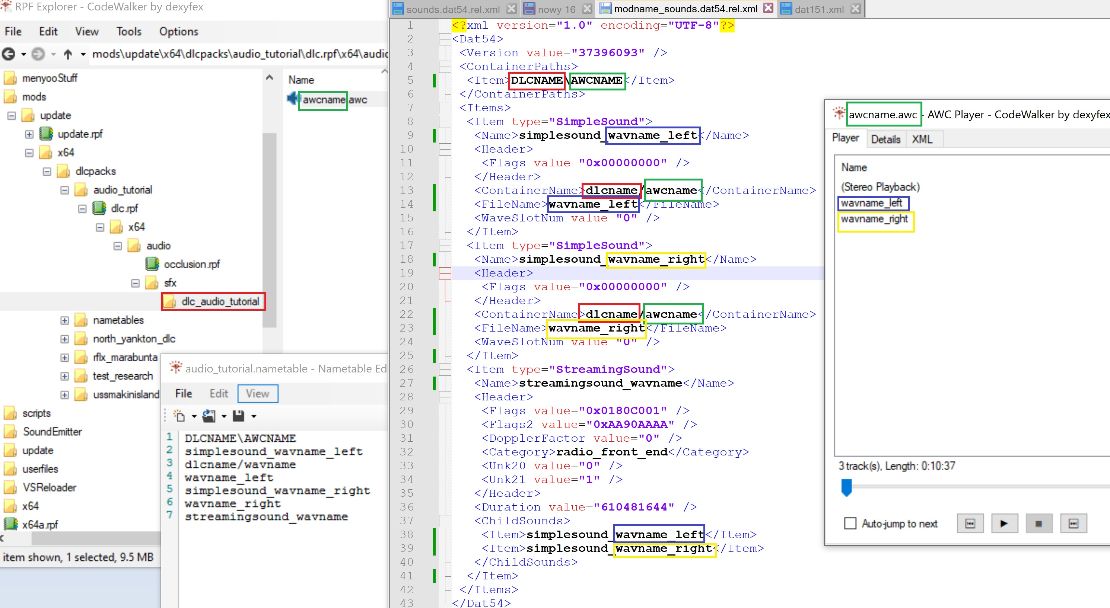
Note: DLCNAME is name of folder where AWCNAME is placed.
streamingsound_wavname it has no _left or _right in name cuz it contains both channels.
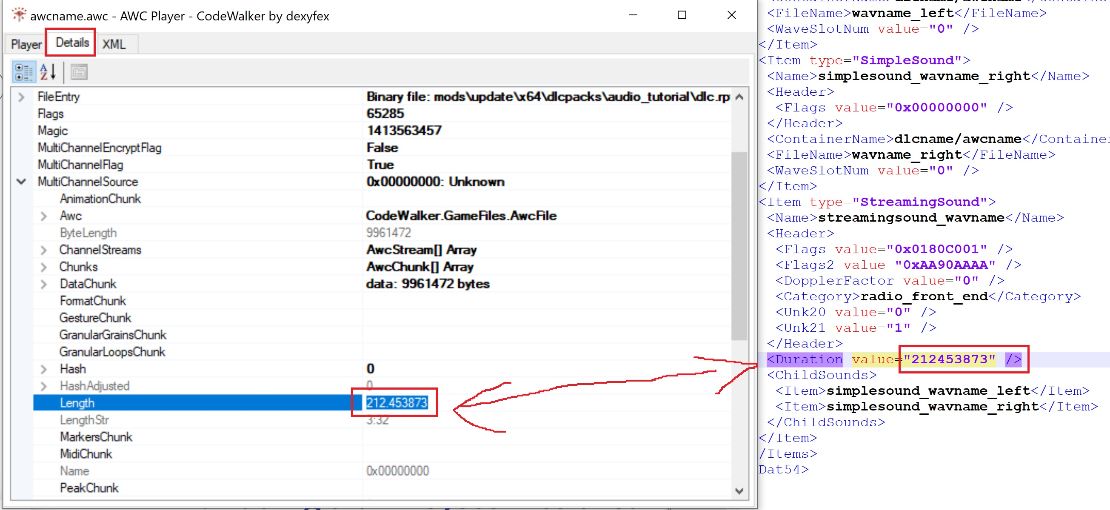
12. To place correct duration go to your .awc file, tab Details->MultiChannelSource->Lenght and copy this value and remove dot:
13. Save all changes and edit now your modname_game.dat151.rel file, open from template dat151.xml and copy these values to your dat151 file:
14. Change all wavname to your custom wav file name (without _left or _right)
Change dlcname to your short dlc name
IMPORTANT: RADIOSTATION_DLCNAME (RadioName) has limit of 32 chars so your custom name of radiostation MUST be less than 33 chars.
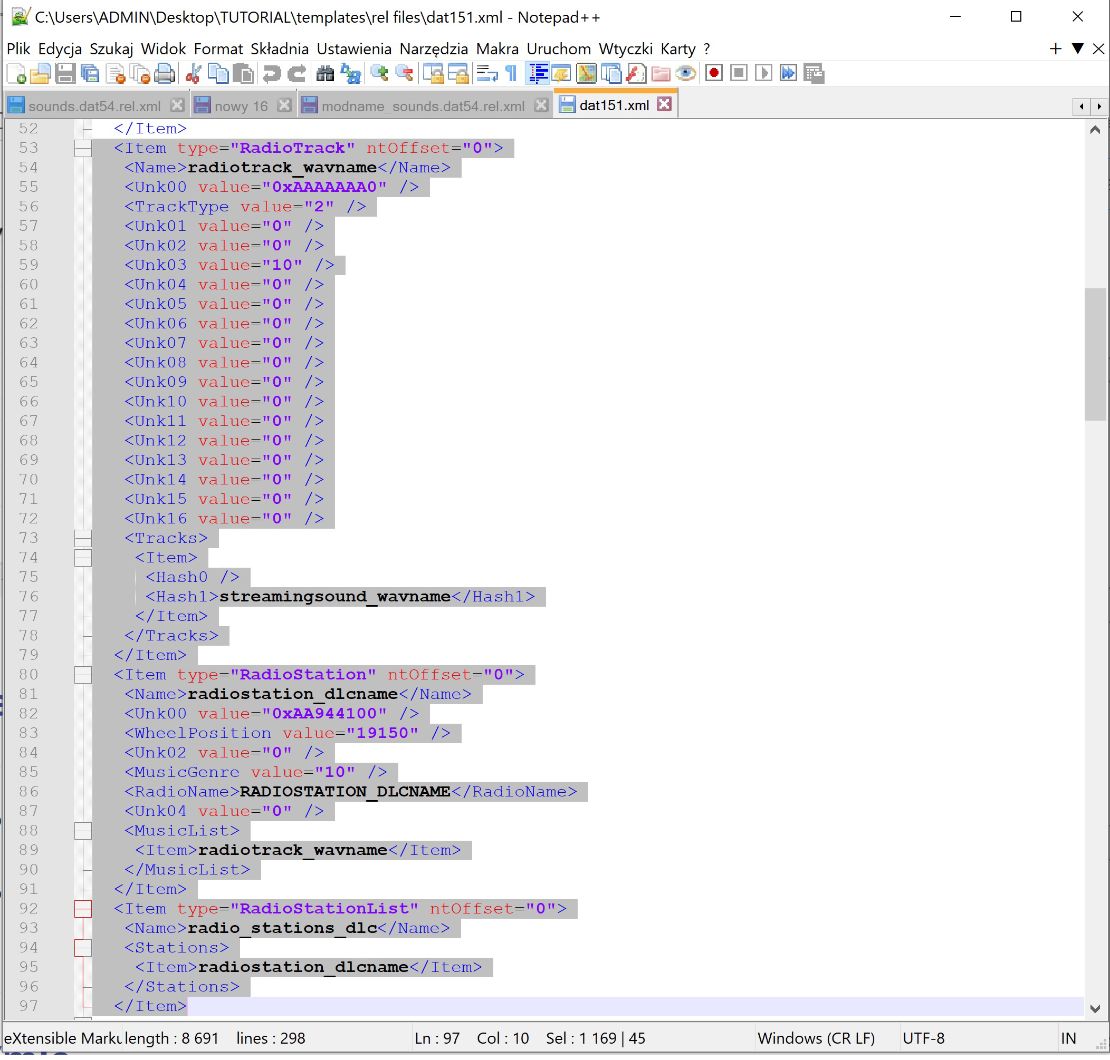
15. Now copy from template file dat151.xml these values and paste it into your modname_game.dat151.rel file:
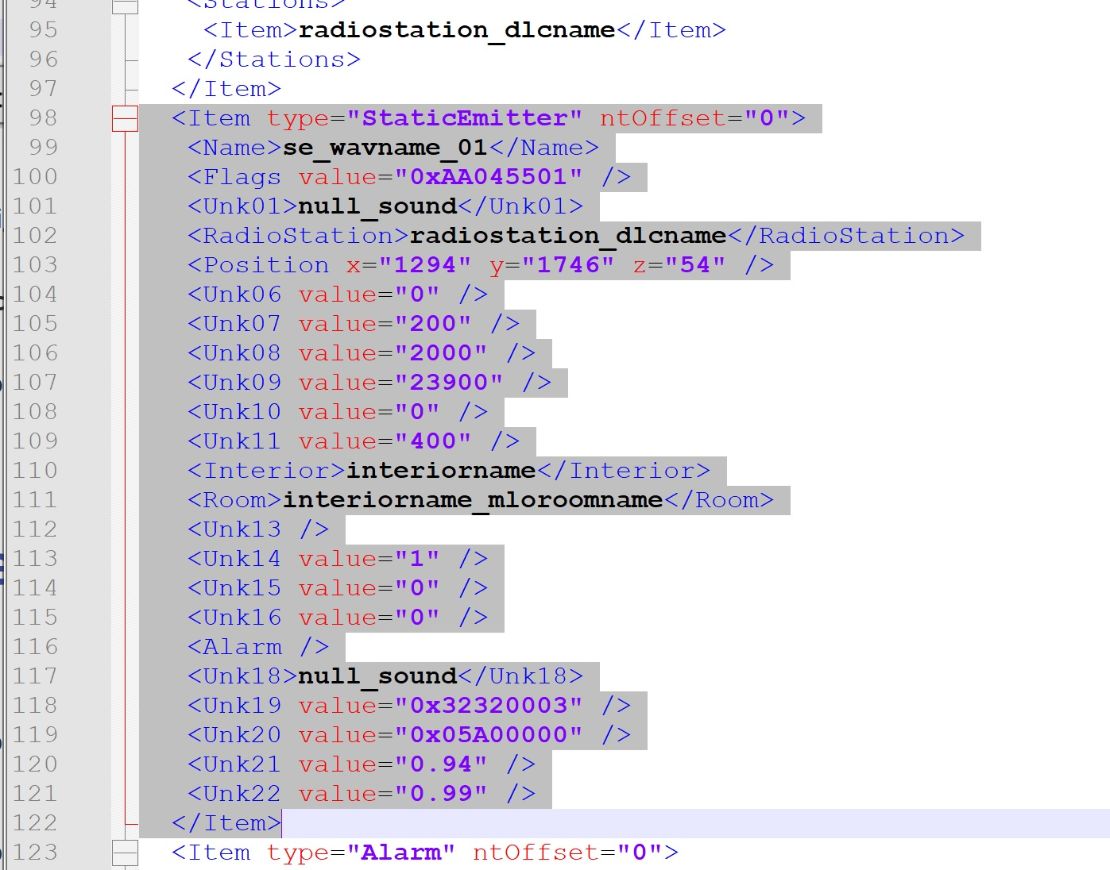
16. Change all names like before (earlier showcased names change for static emitter with vanilla radio) also make sure that static emitters name se_wavname_01 will be different from others static emitters and add it into StaticEmitterList and for RadioStation use your earlier created RadioStation name:
17. To enable/disable your static emitter with custom sound you need to use native AUDIO::SET_STATIC_EMITTER_ENABLED, for example in C#:
Function.Call(Hash.SET_STATIC_EMITTER_ENABLED, "se_wavname_01", true); //setting bool to false will disable emitter
6. Adding ambient sounds to area zone or mlo room.
Using Ambient Zones you can add more ambient sounds to area, like animal sounds, people sounds, phone rings, background traffic city sounds and many many more.
Theres two types of Ambient Zones:
1. Exterior (main ones) - zones with prefixes az_ (have many flags like common 0xAA800424, 0xAA800420 used mostly underground places like tunnels but never use 0xAA800425)
2. Interior - zones with prefixes iz_ have always flag 0xAA800425
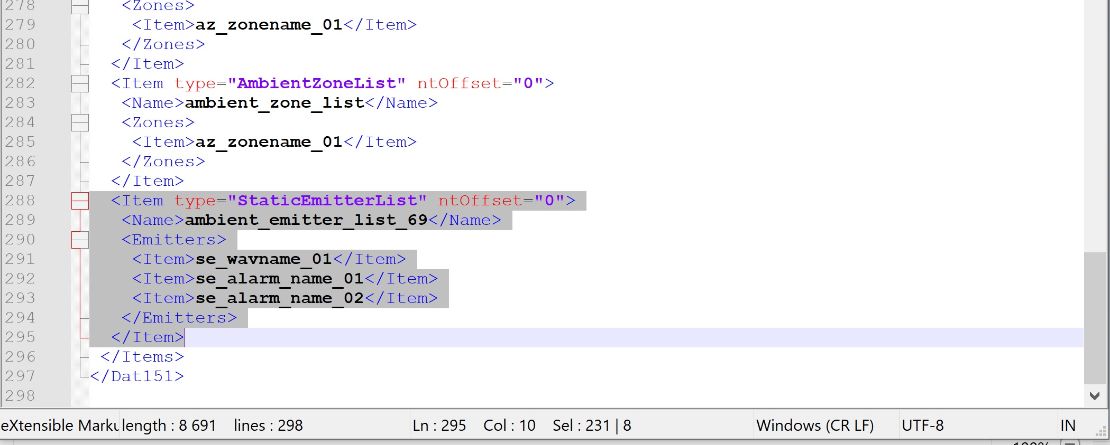
For proper work exterior Ambient Zones are listed and grouped in main AmbientZoneList named ambient_zone_list which contains all zones with prefixes az_
aside of main list you can create custom list of zones which will contain only selected area zones and then you can enable/disable whole list of zones in area using native AUDIO::SET_AMBIENT_ZONE_LIST_STATE.
Note: Interior zones are NOT listed at any AmbientZone list.
Interior zones are created around mlo room inside which you want enable ambient sounds.
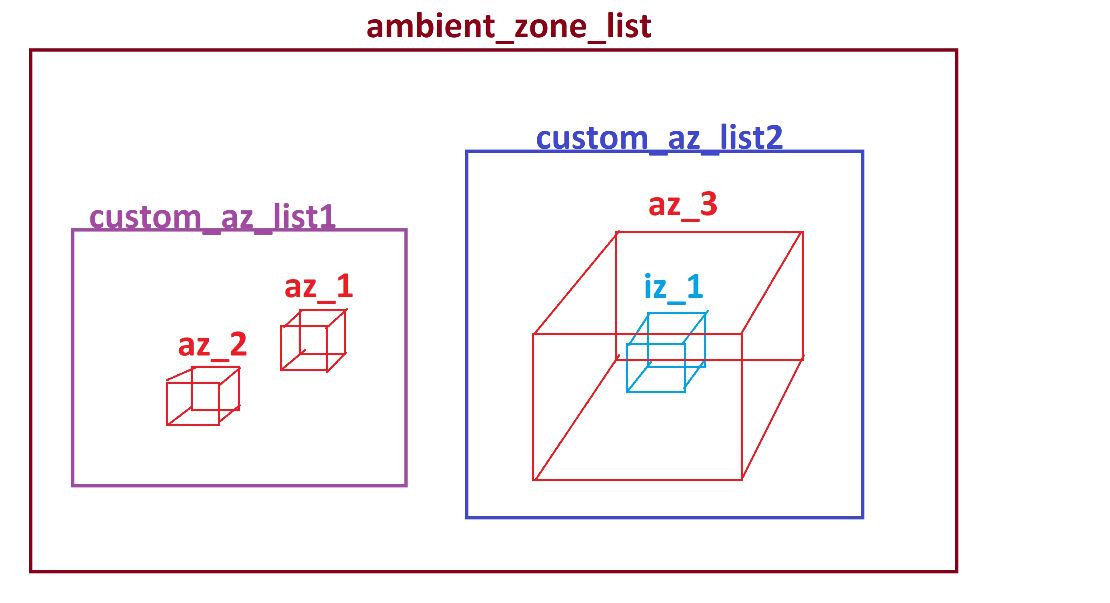
On above example there will be 3 ambient zone lists (one main and two custom) which will contain:
1.Main ambient zone list named ambient_zone_list
-az1
-az2
-az3
2.Custom ambient list named custom_az_list1
-az1
-az2
3.Custom ambient list named custom_az_list2
-az3
Interior zone iz_1 will be NOT listed on any list.
So if you will want to disable az_1 and az_2 you use Function.Call(Hash.SET_AMBIENT_ZONE_LIST_STATE, "custom_az_list1", 0, 0);
and if you will want to disable az_3 you use Function.Call(Hash.SET_AMBIENT_ZONE_LIST_STATE, "custom_az_list2", 0, 0);
1. To create your own ambient zone for mlo edit your modname_game.dat151.rel file and open from templates dat151.xml file and copy paste to your dat151 file:
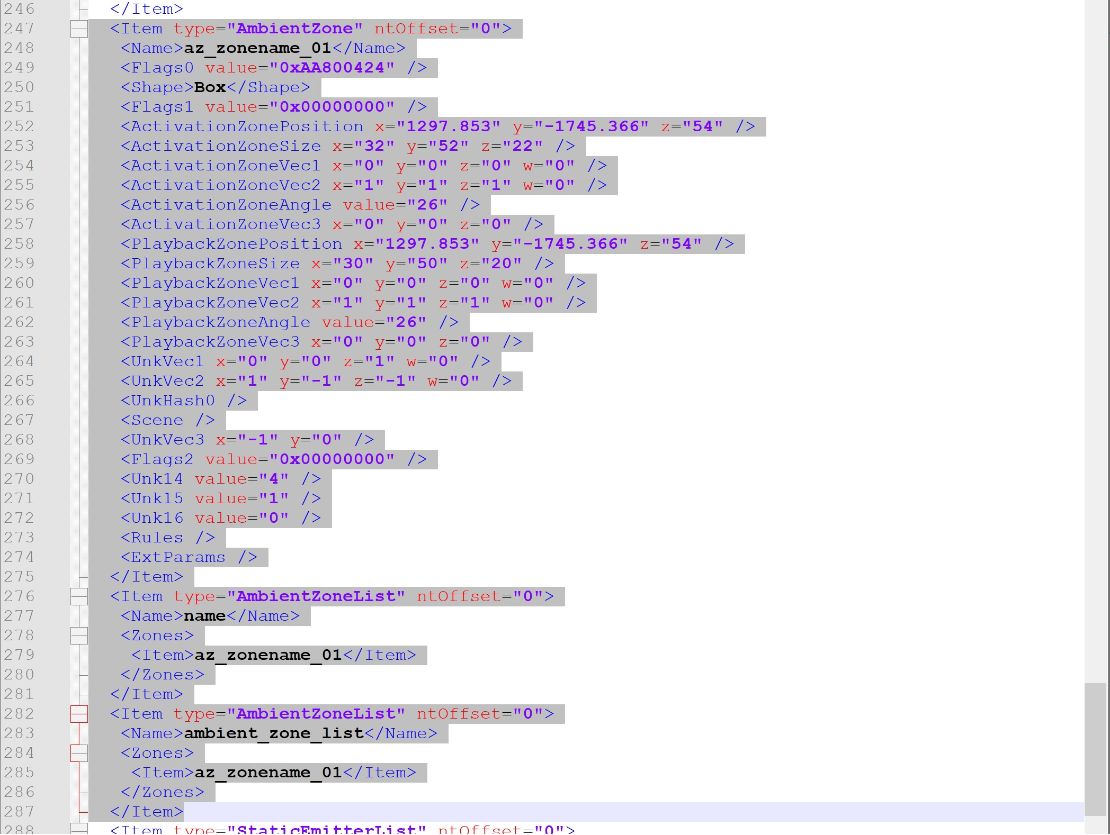
Change name of ambient zone az_zonename_01 to your unique name (change only zonename_01, leave prefix az_ unchanged)
Change name of custom AbientZoneList <Item>name</Item> to your unique name
DO NOT CHANGE name ambient_zone_list it must stay as it is.
Change both coords to your location (it will be exterior ambient zone) rest values leave for now.
2. Copy paste to your rel151 file from template rel151.xml values:+
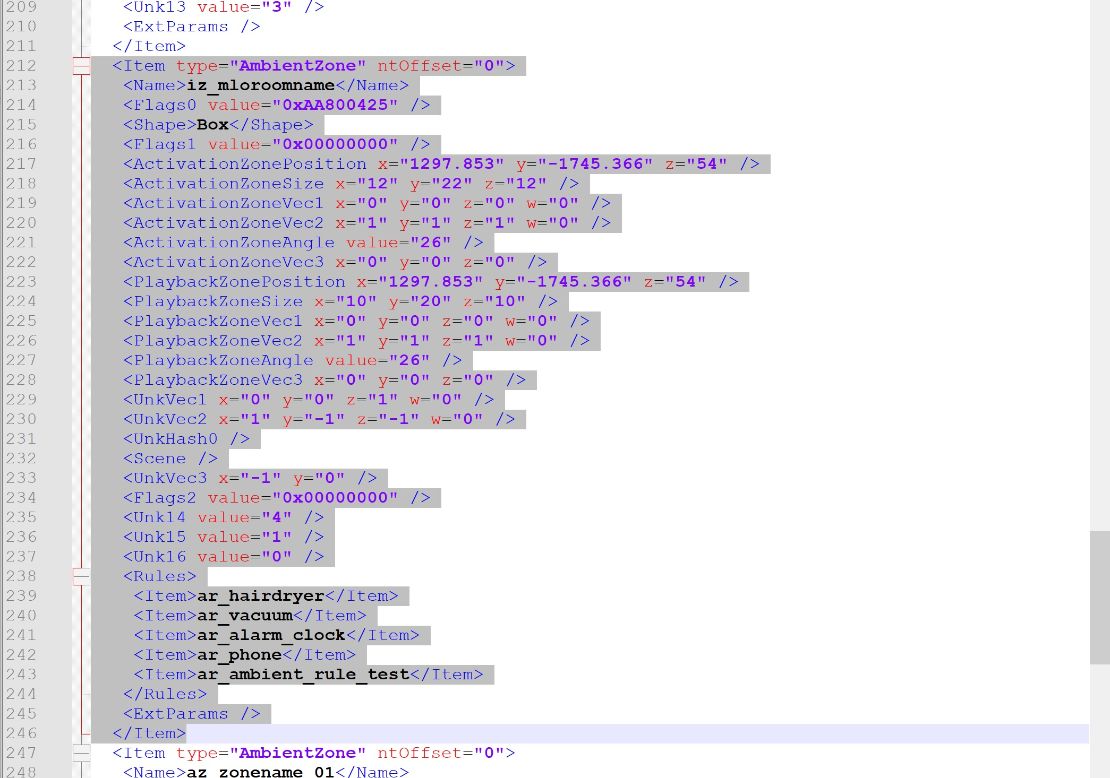
This will be interior ambient zone.
Change both coords into your mlo placement coords
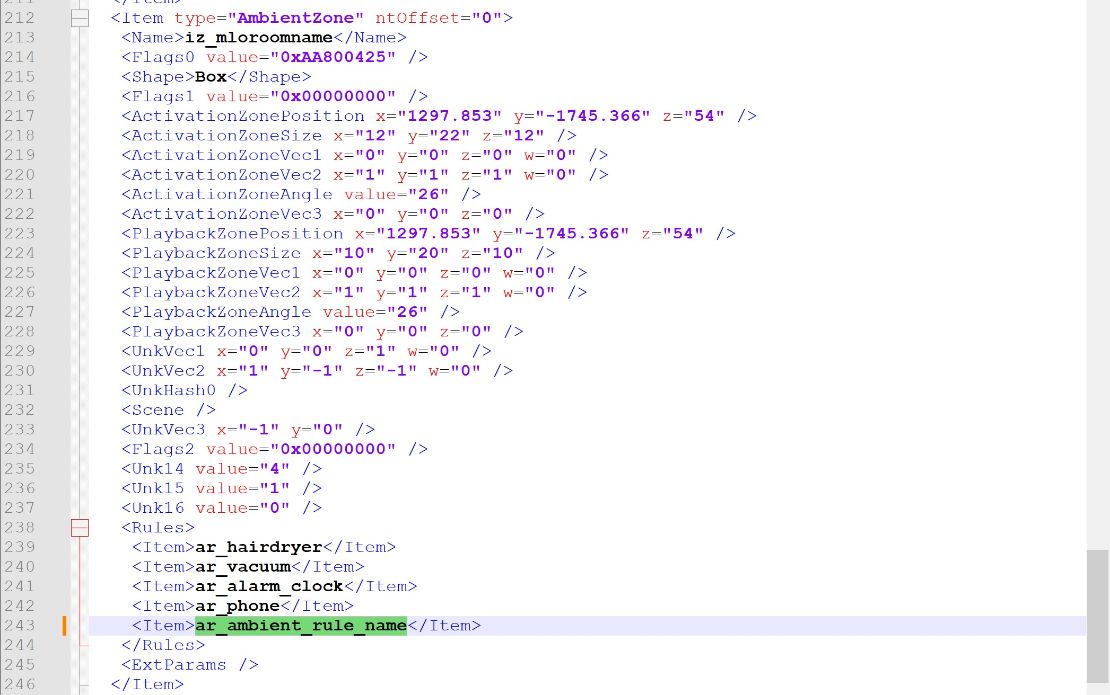
Change name of this ambient zone from iz_mloroomname to your unique name (leaving unchanged prefix iz_) and place this name in your interior room for which you create this zone:
Reminder: place all new unique names in .nametable otherway names will be hashed
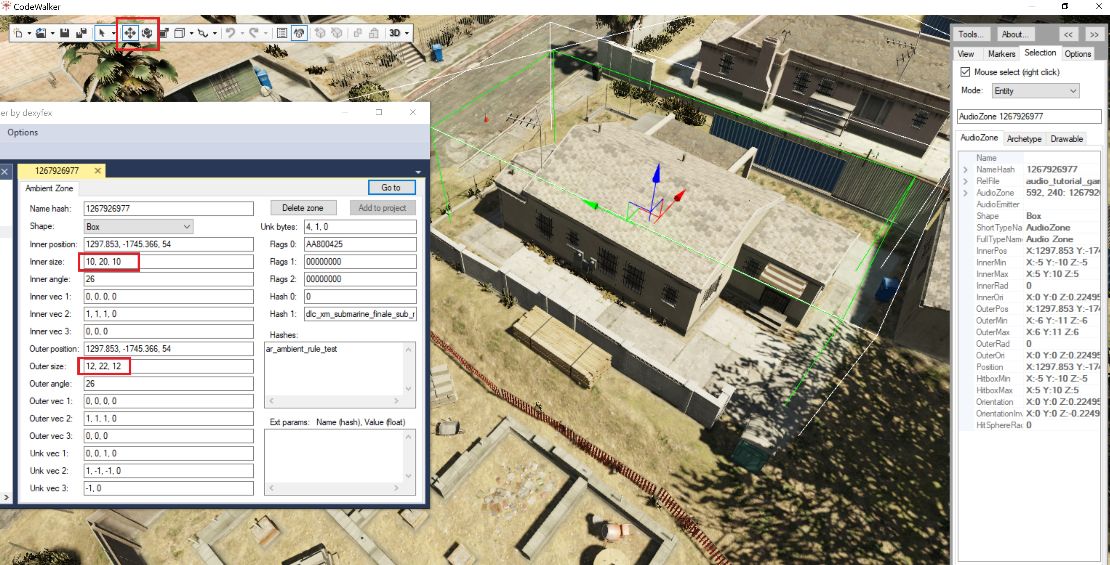
Save changes and import your dat151 file into project in CodeWalker, enable audio edition and go to your zone location:
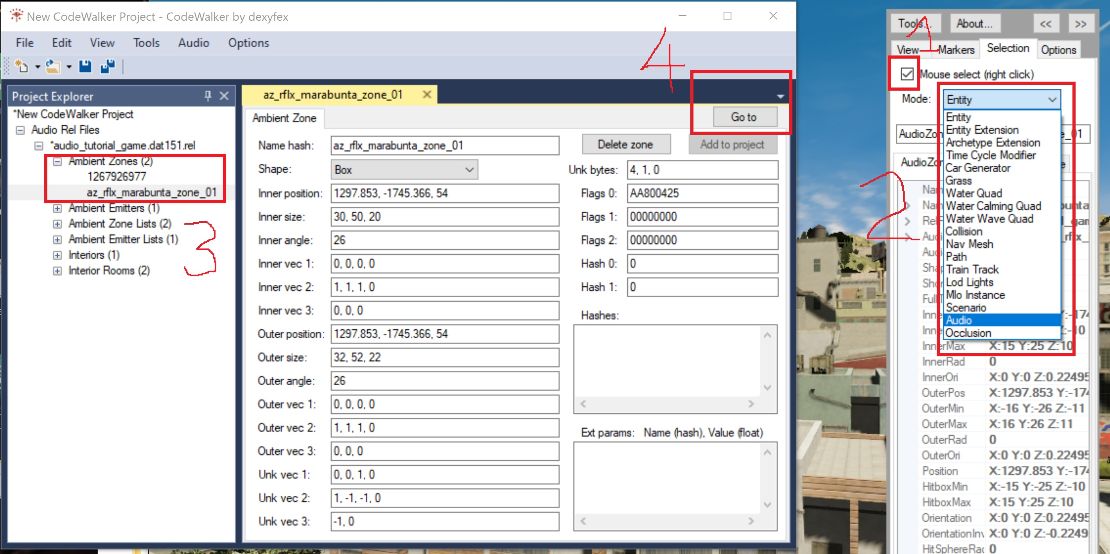
Now adjust position and rotation of your both zones.
Adjust size manually by increasing/decreasing values in Inner size and Outer size
Outer size must be biger than inner size
Save changes and put back your file into rpf explorer and edit it. Go back to your interior ambient zone section.
Adding ambient sounds into your interior ambient zone you use AmbientRules:
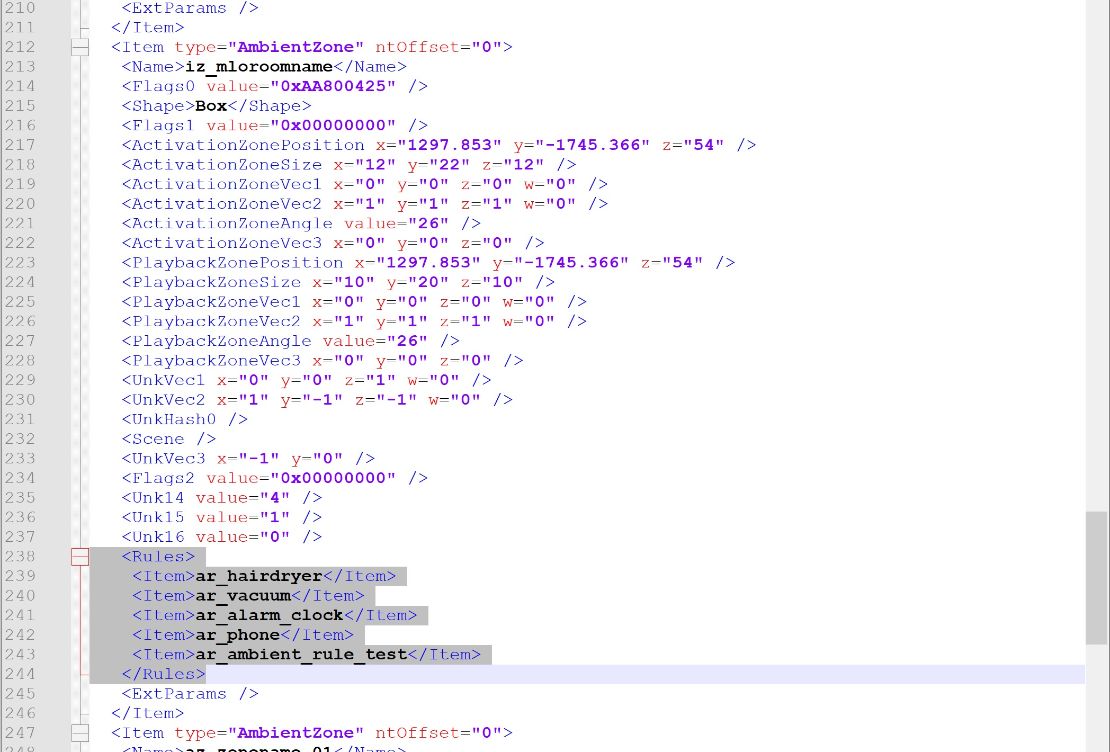
You can search for tons of different vanilla ambient rules by searching <rules> in any vanilla dat151 file:
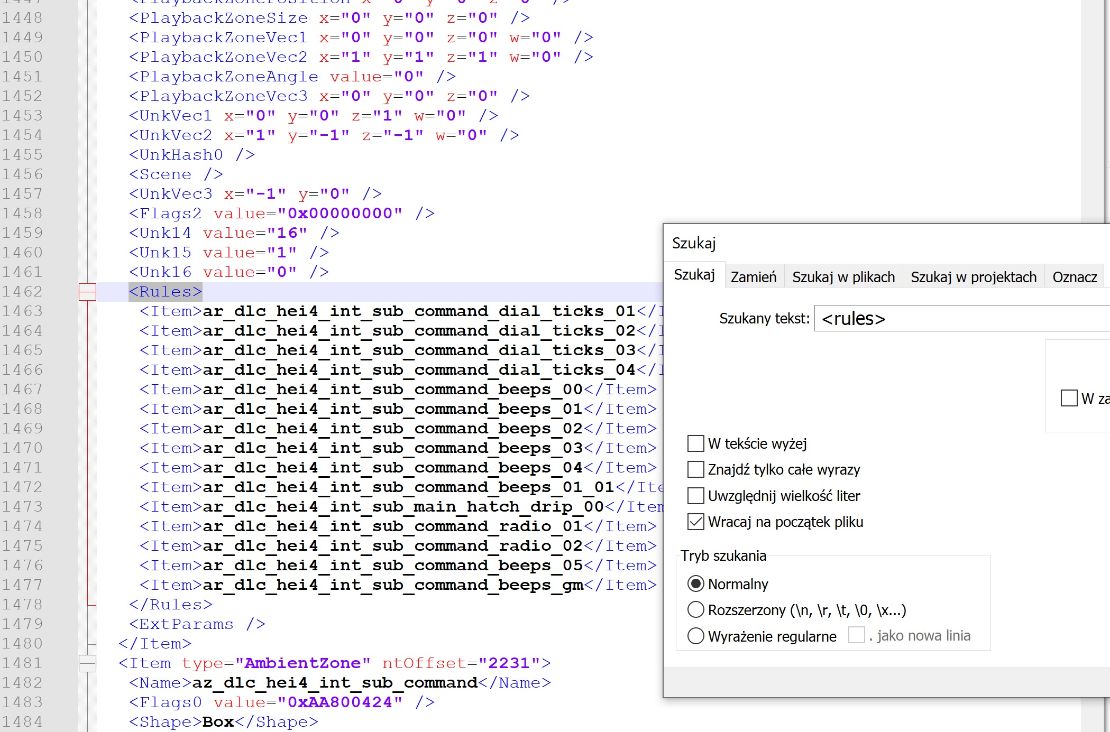
But not all vanilla ambient rules will work inside your zone. Some of them have unique coords for different location like for example:
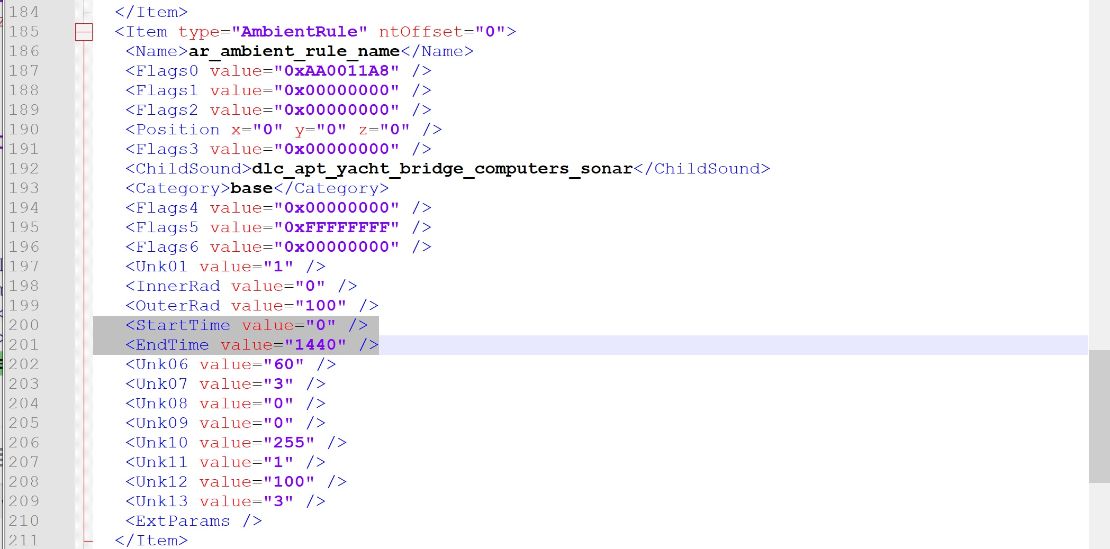
In that case copy whole ambient rule section from vanilla dat151 and paste it into your dat151 change name of this ambient rule to custom one like ar_ambient_rule_name, change coords to your location (word coords) and place this custom name of ambient rule in your interior ambient zone:
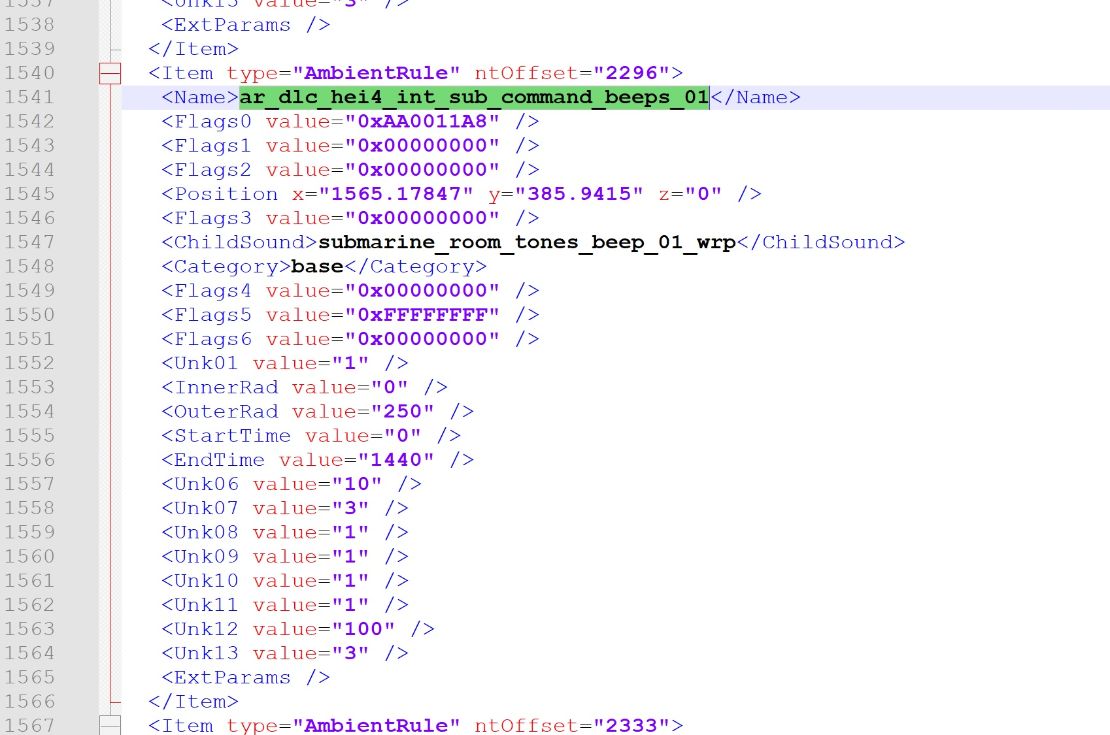
You can set advanced settings for each rule for example on what time it will be played and on what time not by changing these values:
StartTime 0 and EndTime 1440 means it will be played 24H
If you want to setup specific time for example from 9:35 to 17:15 you need:
9:35 -> (9+(35/60))x60 -> 575= StartTime
17:15 -> (17+(15/60)x60 -> 1035 = EndTime
To see oposite whats is time you do:
StartTime =
Hour: 575 / 60 = 9.583333333333333 cut everything after dot to get hour in this case hour will be 9
Minutes: Take everything from above after dot and multiply by 60 (0.583333333333333x60=35) so minutes are 35
Total Start time is 9:35
EndTime =
Hour: 1035/60=17.25 cut everything after dot to get hour in this case hour will be17
Minutes: Take everything from above after dot and multiply by 60 (0.25x60=15) so minutes are 15
Total EndTime is 17:15
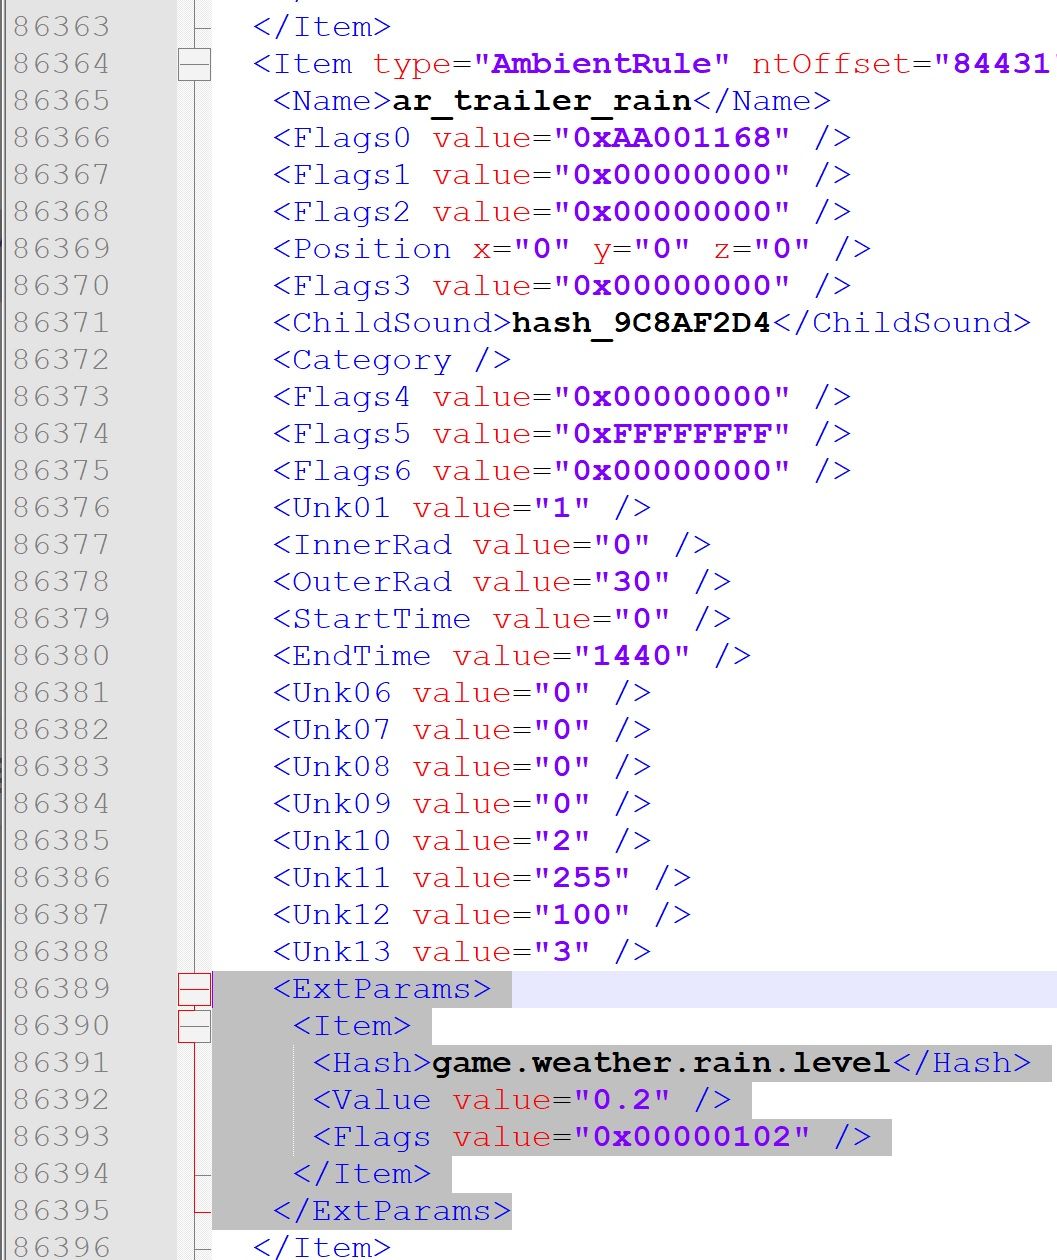
One of other advanced settings for playing ambient audio you can add in ExtParams, for example sound will be played if rain level will be at certain value:
More tutorials with advanced edits will be in future when will have time for it (if nobody else will not do it earlier ofcorse) cuz it take too much time for doing this tutorials. >_<
7. Adding alarm system to area/mlo.
Using static emitters and alarm entry in dat151 u can build alarm system. Compared to normal static emitters u dont enable or disable them. For this will be used natives:
AUDIO::START_ALARM -> this will enable main alarm and all static emitters signed to this alarm
AUDIO::STOP_ALARM -> this will disablemain alarm and all static emitters signed to this alarm
To place own alarm system in yor mlo or area open your modname_game.dat151.rel file and open from templates dat151.xml file and copy paste to your dat151 file:
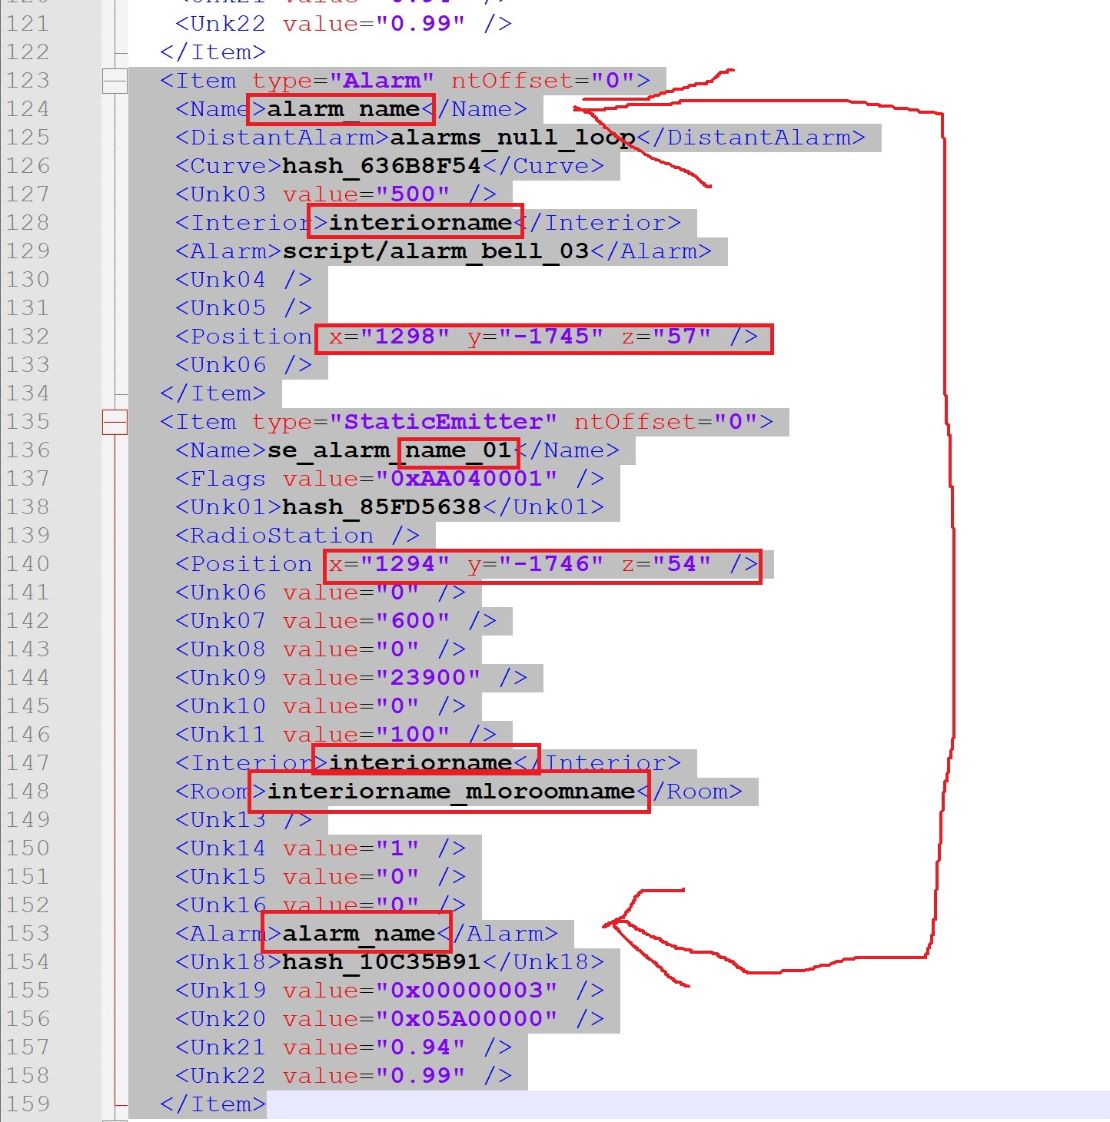
Change all selected names to unique ones and make sure to have same name for alarm in "Alarm" and "StaticEmitter"
For coords place alarm bit higher compared to static emitter cuz alarm is far sound and emitter is close sound, you can add many emitters to one alarm but in each make sure to have same alarm name.
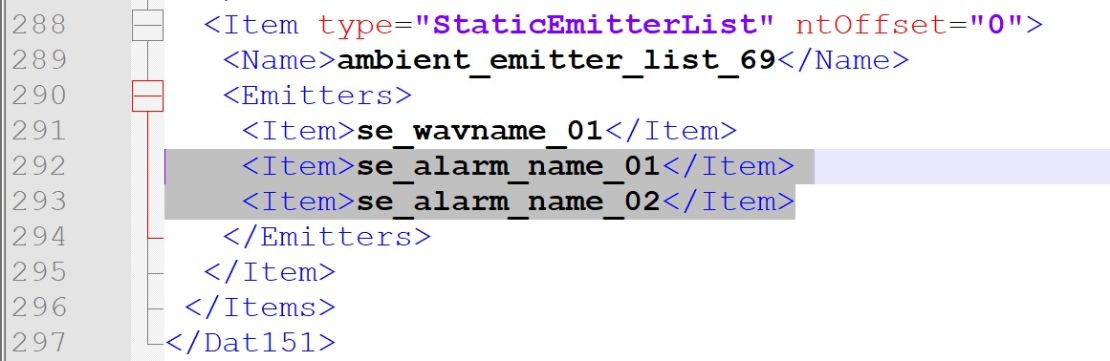
Place also all your alarm static emitters under StaticEmitterList otherway they will not work:
Before activating alarm use AUDIO::PREPARE_ALARM
otherway u will need to call two times AUDIO::START_ALARM at first alarm start
To stop alarm use AUDIO::STOP_ALARM
C# native example:
Function.Call(Hash.PREPARE_ALARM, "alarm_name");
Function.Call(Hash.START_ALARM, "alarm_name", 0);
Function.Call(Hash.STOP_ALARM, "alarm_name", 1);
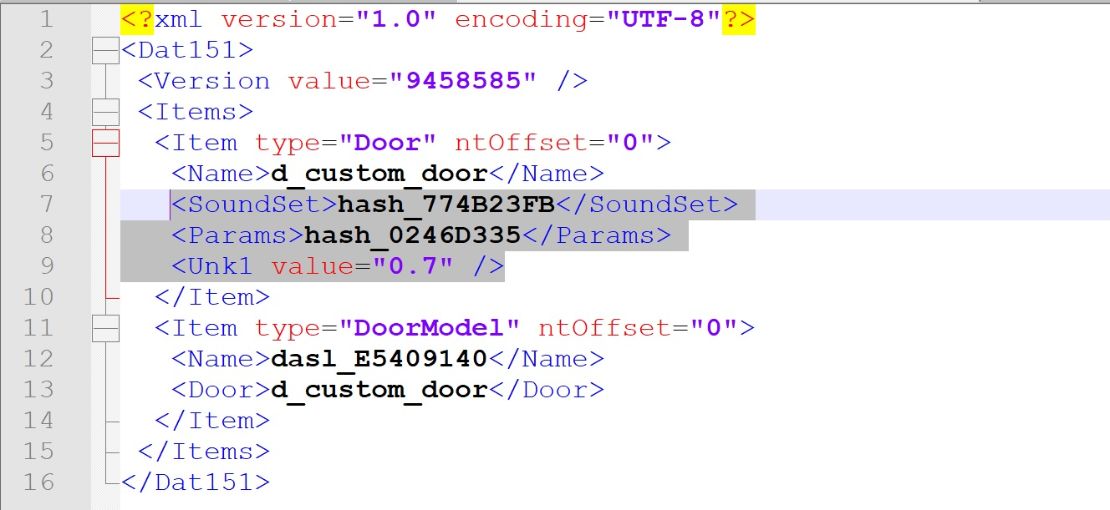
8. Vanilla audio to custom door
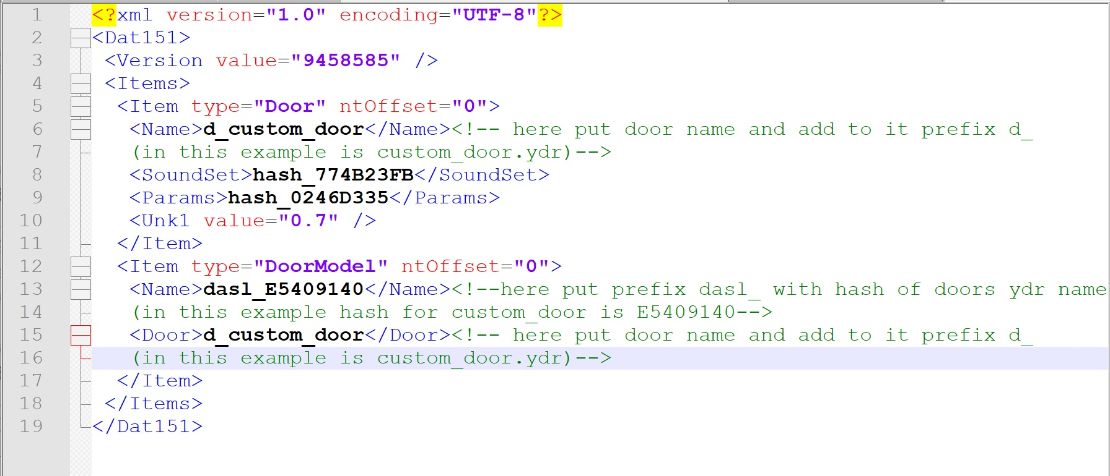
To add vanilla sound to your custom door you need to create dat151.rel file.
Use template for it if you want.
It will looks like this:
To generate hash use in CodeWalker JenkGen... - its under Tools:
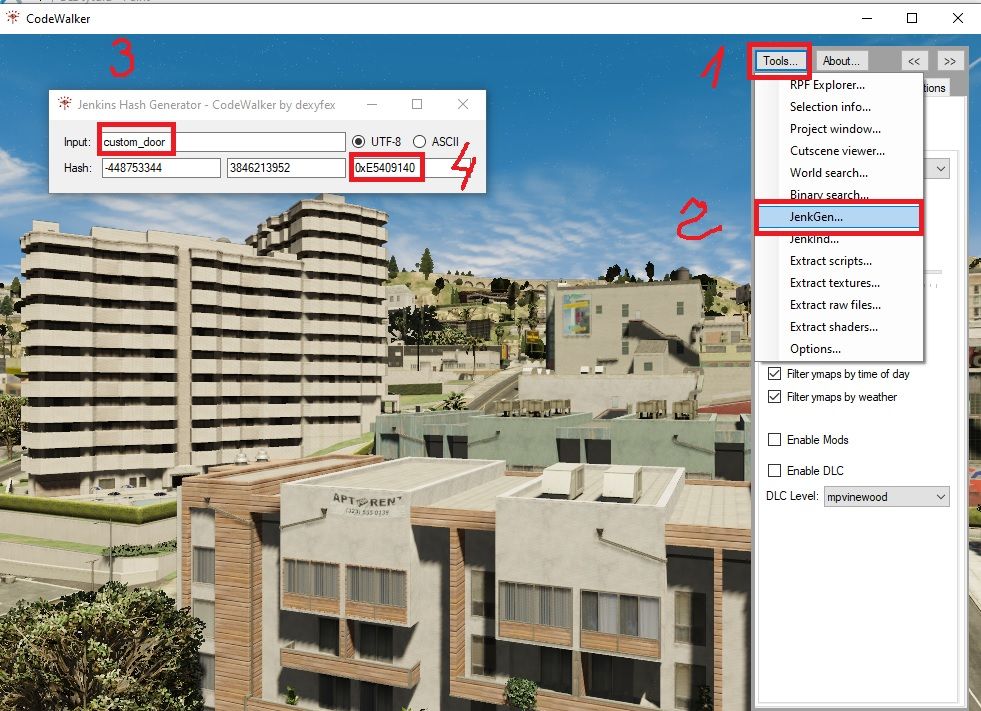
IMPORTANT THING
This sound will not work for all types of doors! Setting from template is for normal doors (pushed by player).
Explanation >here<
To use different sounds for different types of doors (way of opening) you need to change these values:
Into one of these: >LINK<
Now save your xml file as your_name_game.dat151.rel.xml
Then import it into your DLC using RPF explorer in CodeWalker:
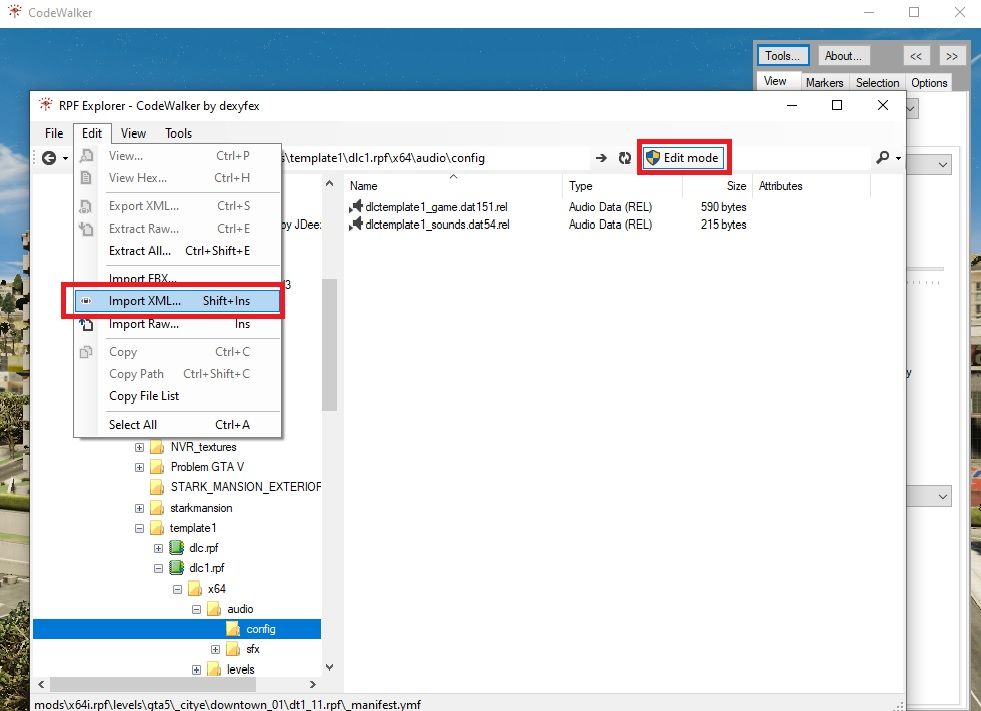
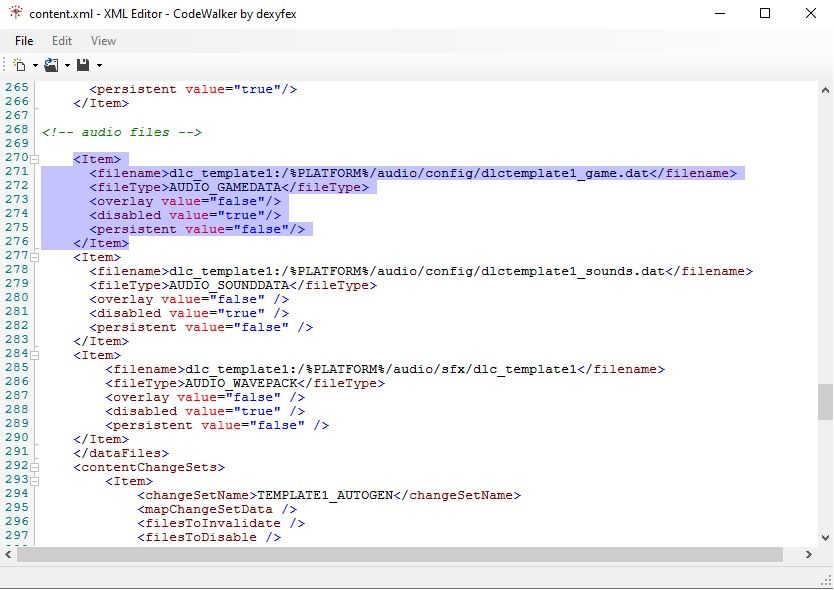
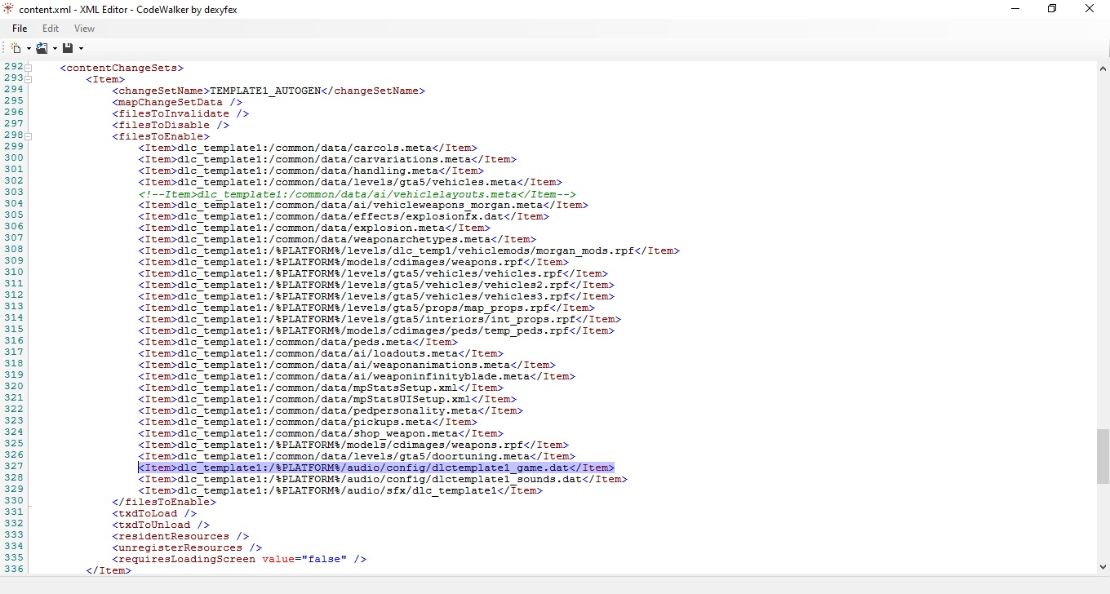
You need also entries in content.xml but link to file is not like your_name_game.dat151.rel but your_name_game.dat
How to find vanilla sound setting in game.dat151.rel
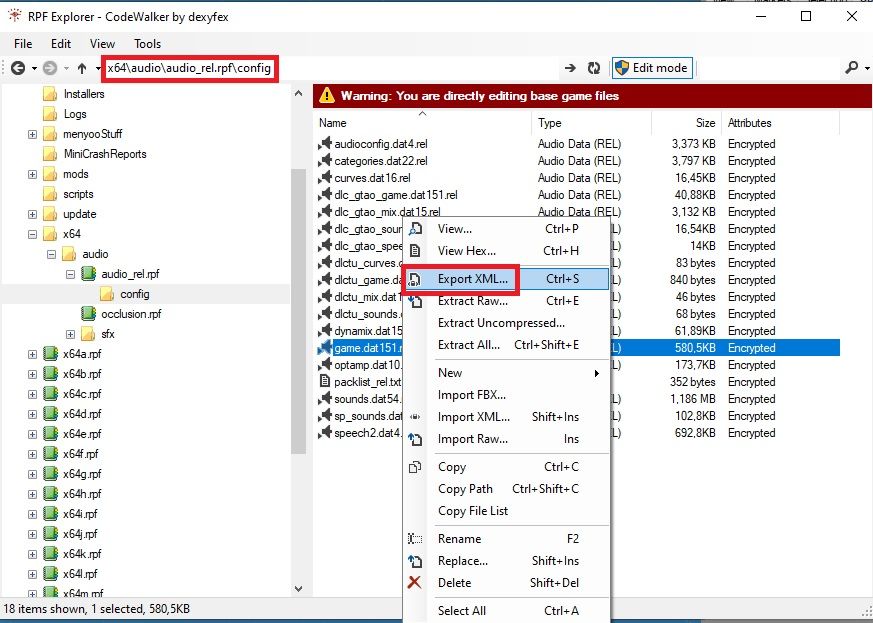
To use sound from specified vanilla door in your custom door you need first to export game.dat151.rel into xml using CodeWalker:
For example you want to use sound from v_ilev_cd_secdoor.ydr for your custom door.
First make sure your custom doors got same way of opening like vanilla door then open exported xml file in notepad and search for v_ilev_cd_secdoor
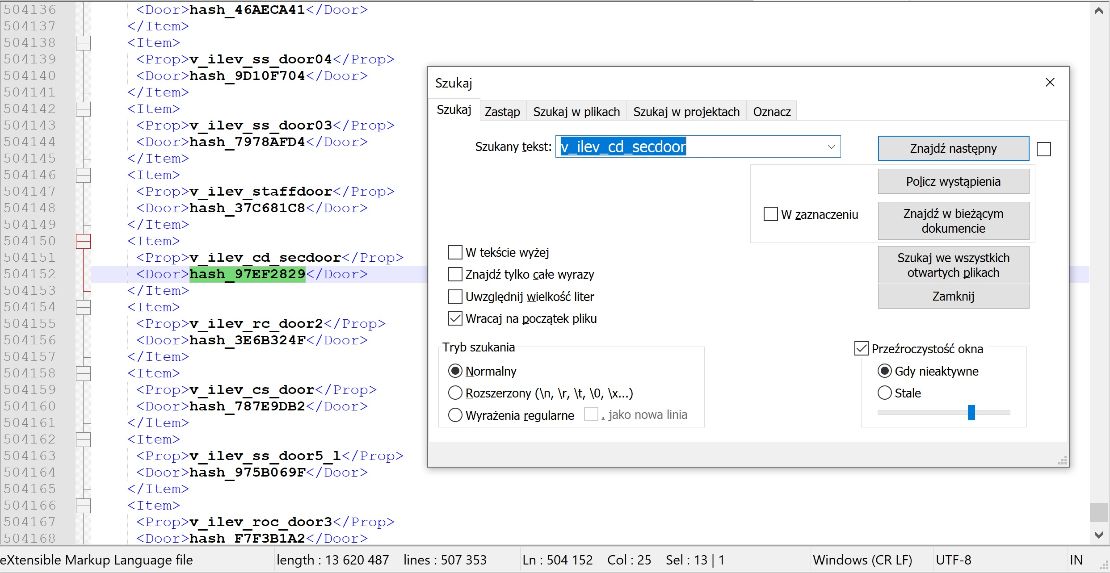
Then copy hash from <Door> and search again.
(hash_97EF2829 = d_v_ilev_cd_secdoor)
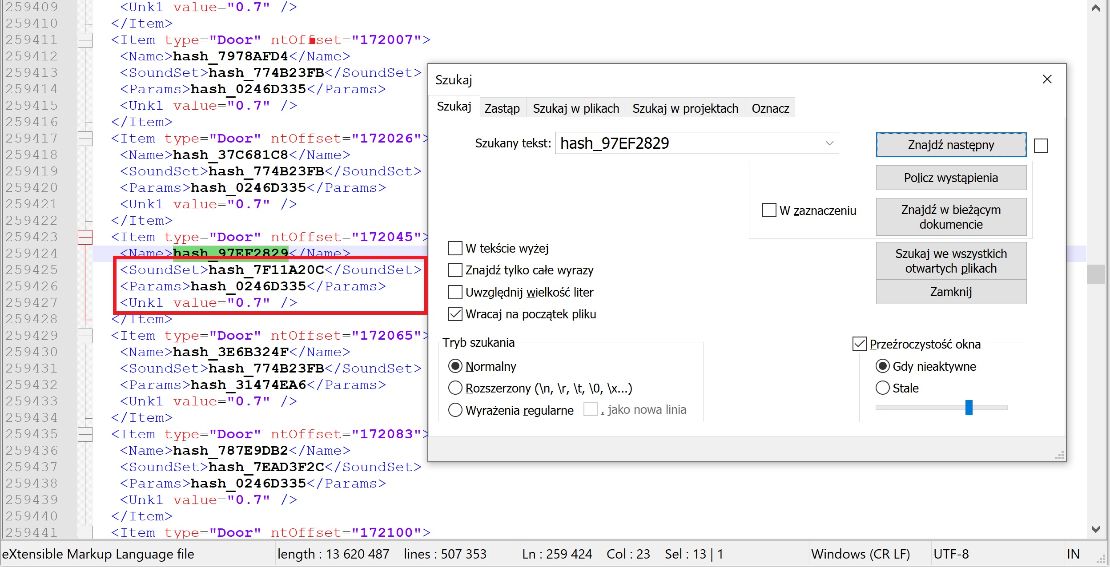
And copy above values (inside red rectangle) into your custom rel file.
Custom audio to custom door (WIP) [explanation of data conections in rel files]
This section i will update in future. For now i will leave explanation:
On example v_ilev_carmod3door.ydr
game.dat151.rel
<Item type="Door" ntOffset="176558">
<Name>hash_75C294E2</Name> ``d_v_ilev_carmod3door``
<Unk0 value="0x0CA57A12" /> ``this refers to .dat54.rel where are settings for type of opening door``
<AudioTrack0>hash_26F74E7D</AudioTrack0> ``this refers to .dat151.rel (sound settings?)``
<Unk1 value="0.7" />
</Item>
game.dat151.rel
<Item type="Unk48" ntOffset="178363">
<Name>hash_26F74E7D</Name>
<Flags value="0xAAAAAAA8" />
<Unk01 value="0.95" />
<Unk02 />
<Unk03 value="0.05" />
<Unk04 value="0.05" />
<Unk05 value="1" />
<Unk06 value="0.0001" />
<Unk07 value="0.003" />
<Unk08 value="2" />
</Item>
sounds.dat54.rel
Here are defined sounds for ways how open doors. Ways are defined under ScriptName. (Doors with other way of opening than this (garage) got different set of ScriptName and this causes that sounds dont work in all types of doors)
<Item type="SoundSet">
<Name>hash_0CA57A12</Name>
<Header>
<Flags value="0xAAAAAAAA" />
</Header>
<Items>
<Item>
<ScriptName>opened</ScriptName>
<SoundName>hash_3E51C3A0</SoundName> related to audio setting
</Item>
<Item>
<ScriptName>closed</ScriptName>
<SoundName>hash_F01A8A49</SoundName> related to audio setting
</Item>
<Item>
<ScriptName>opening</ScriptName>
<SoundName>hash_BDBFEFAA</SoundName> related to audio setting
</Item>
<Item>
<ScriptName>closing</ScriptName>
<SoundName>hash_BDBFEFAA</SoundName> related to audio setting
</Item>
</Items>
</Item>
sounds.dat54.rel
<Item type="WrapperSound">
<Name>hash_3E51C3A0</Name>
<Header>
<Flags value="0x00609010" />
<Unk04 value="100" />
<Unk10 value="30" />
<Category>doors</Category>
<Unk18 value="250" />
<Unk19 value="10" />
</Header>
<AudioHash0>hash_645B4D6E</AudioHash0> this refers to settings wheres audio input is
<FrameStartTime value="0" />
<AudioHash1 />
<FrameTimeInterval value="0" />
<Variables />
<AudioTracks>
<Item>hash_645B4D6E</Item> this refers to settings wheres audio input is
<Item />
</AudioTracks>
</Item>
<Item type="SimpleSound">
<Name>hash_645B4D6E</Name>
<Header>
<Flags value="0x00000000" />
</Header>
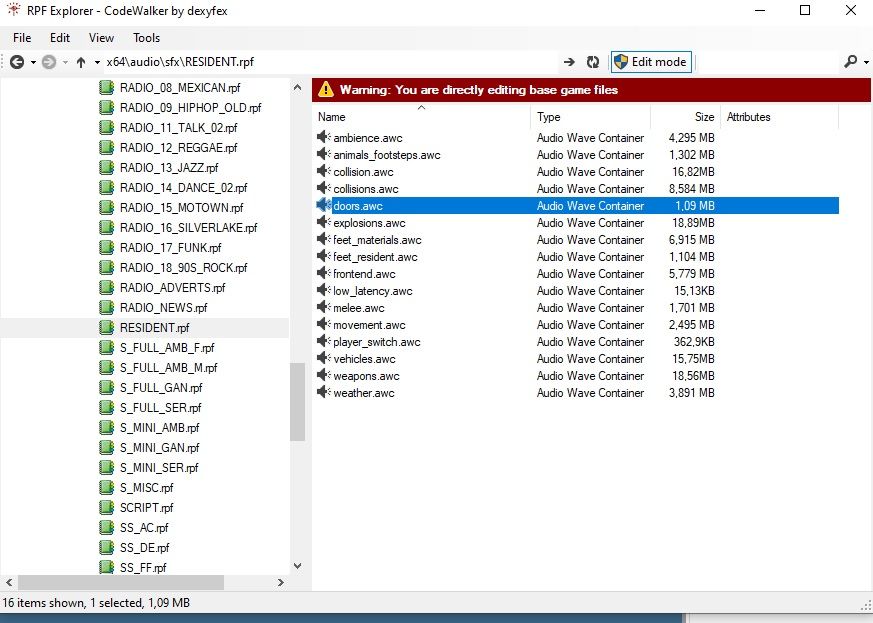
<ContainerName>resident/doors</ContainerName> ``refers to location of .awc file in sfx folder``
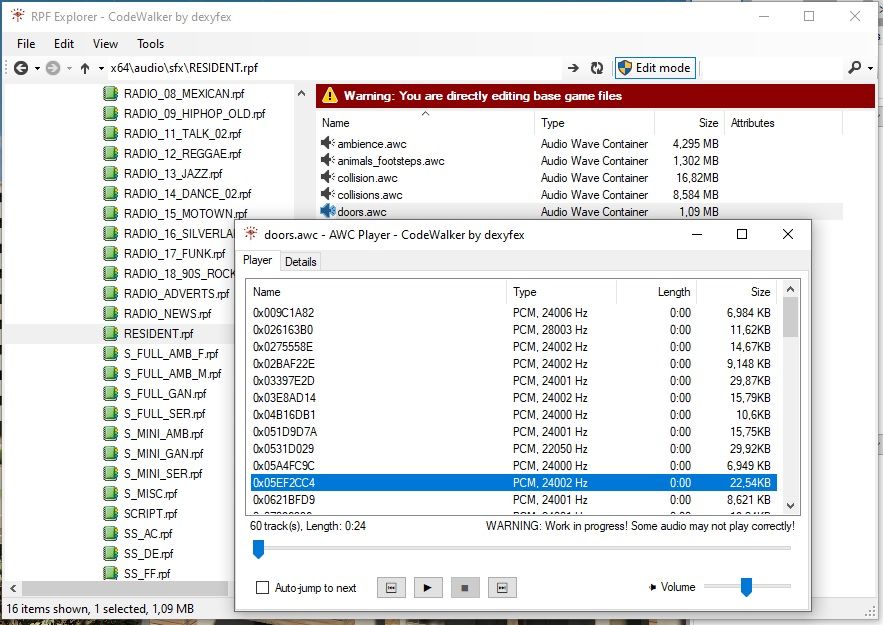
<FileName>hash_85EF2CC4</FileName> ``name of audio inside .awc``
<WaveSlotNum value="0" />
</Item>
© 2019-2022 All rights reserved by Dekurwinator.